Network management is an essential skill for both network administrators and engineers.
In this post, we'll cover several fundamentals to understanding and implementing the most important network management techniques.
Out-of-Band Management Port (OOBM)
The ArubaOS-CX switch family includes an Out-of-Band Management (OOBM) port, which is used solely for switch monitoring and management purposes. Because ArubaOS-CX has a separate VRF for management within the operating system, the management plane and data plane are completely isolated. Data traffic cannot see or use this port. This complete isolation prevents management traffic from consuming bandwidth on the data plane.
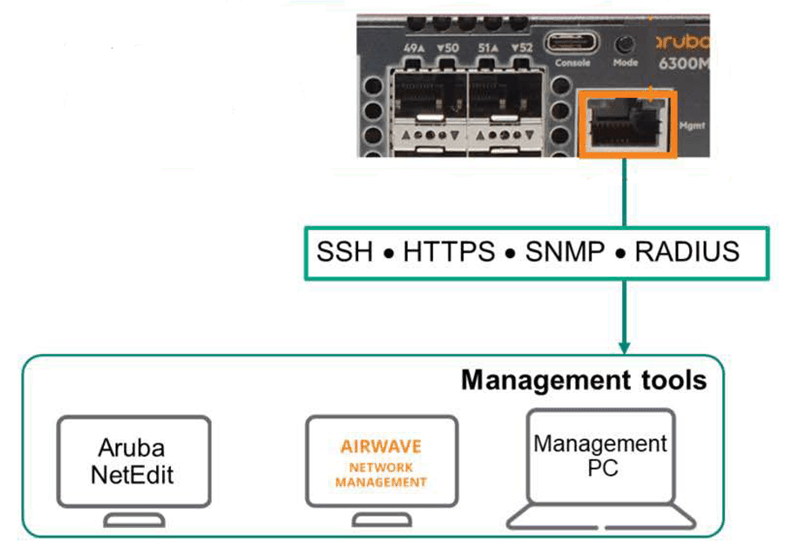
This is commonly referred to as out-of-band management or OOBM.
You can also remotely connect to and manage the switch via a standard Ethernet port. This is called in-band management. While this may seem convenient, it's not recommended. Misconfiguration of switch routing or protocols can result in loss of management access.
Additionally, if you do not manually configure security controls, there is a security issue that allows hackers to access the switch configuration and take control of the device.
VRF for management
already Previous postWe learned about VRF in . VRF creates another virtual router inside the physical router using a separate routing table.
ArubaOS-CX devices have a data plane for: default VRFand a separate management port for handling OOBM traffic. mgmt VRFexists.
The ArubaOS-CX management interface is enabled by default and is configured to receive an IP address using DHCP. You can check the status of this interface using the "show interface mgmt" command.
If necessary, you can manually configure the IP address in the management interface as follows:.
Switch(config)# interface mgmt
Switch(config-if-mgmt)# ip static
Switch(config-if-mgmt)# default-gateway <default gateway address>
Switch(config-if-mgmt)# nameserver
Using the Ping and Traceroute Commands in a Management VRF
By default, the Ping and Traceroute commands on ArubaOS-CX switches operate on the default VRF.
If you want to check the connection in mgmt VRF, you must use the ping and traceroute commands by specifying mgmt VRF as shown in the following figure.
Switch# ping 192.168.1.20 vrf mgmt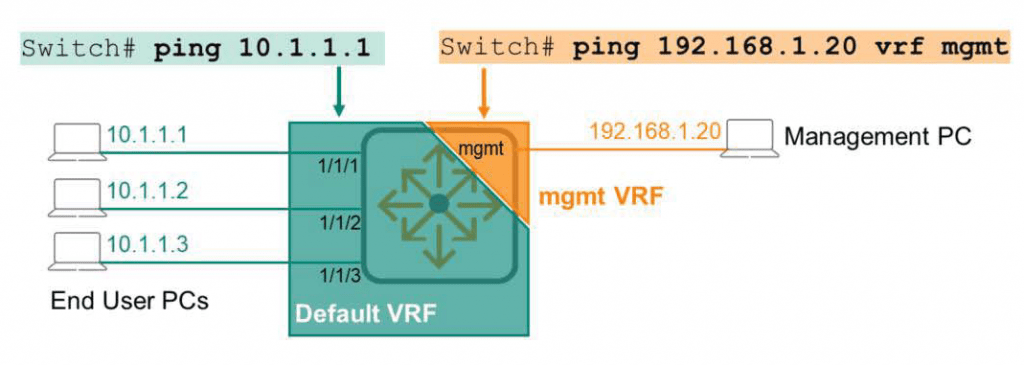
SSH in ArubaOS-CX
Accessing the Command Line Interface (CLI) of an ArubaOS-CX switch requires the use of the Secure Shell (SSH) protocol. SSH provides a secure connection between the switch and the administrator's PC.
SSH is enabled by default in the default VRF and disabled in the mgmt VRF.
To use SSH in mgmt VRF, you need to enable it separately as follows.
Switch(config)# ssh server vrf mgmtTo check the SSH status in the management interface, use the “show ssh server vrf mgmt” command.
Typically, when SSH is enabled on the management plane, many administrators disable SSH on the data plane.
Even though SSH requires credentials for authentication and is considered secure, disabling SSH on the data plane fundamentally prevents end users or malicious users from connecting via SSH.
HTTPS in ArubaOS-CX
HTTPS provides secure GUI access to the switch, similar to SSH. HTTPS is also enabled by default only in the default VRF. Therefore, use the following command to enable HTTPS on the management plane.
Switch(config)# https-server vrf mgmtAnd for security, disable HTTPS on the default VRF.
Switch(config)# no https-server vrf defaultWeb interface
ArubaOS-CX switches have a built-in GUI web interface for device monitoring and management.
To use this interface, simply enter the switch IP address in your web browser and connect.
https://switch-ip-address
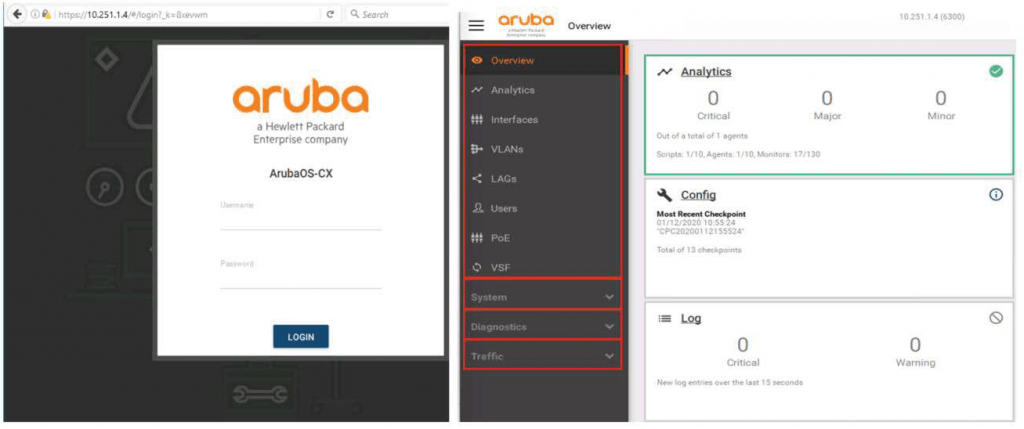
On the left is a menu divided into four sessions.
- Overview: Displays basic protocol and feature information. This includes information on analytics, interfaces, VLANs, LAGs, users, PoE, VSF, and more.
- System: Displays environment information, logs, DNS servers, SNMP configuration, and configuration management.
- Diagnostics: Includes features like Ping and Traceroute.
- Traffic: This menu contains information related to Spanning-Tree.
It is important to note that the best way to use HTTPS/GUI is to enable it only on the mgmt VRF.
AAA (Authentication / Authorization / Accounting)
AAA is a security concept that involves three separate processes:.
- Authentication: Control who gets access – Who are you?
The system validates credentials when a user attempts a data plane connection to the default VRF or an administrative connection to the mgmt VRF.
Credentials can be in the form of a username and password, a digital certificate, or a pre-shared key (PSK).
- Authorization: Control what you can do when authentication is complete – What can you do?
This process grants privileges to authenticated users.
For example, can you connect to the network and use resources? Do you have read-only access to the switch's CLI or GUI? Do you have full read/write access to the switch CLI? This depends on the administrator's authorization level.
- Accounting (Account Management): Generate event logs to track what you do – What did you do?
“Provide records such as ”Hong Gil-dong accessed the sales file at 3:30 p.m., Kim Cheol-su deleted the accounting file at 2 a.m., and Lee Young-su modified the switch’s CLI at 12:45 p.m. last Thursday.”
AAA is often used with a RADIUS (Remote Authentication Dial-In User Service) server.
Role-Based Access Control – RBAC
Administrator privileges allow you to access and configure the switch. They also have visibility into all switch processes.
While this may be perfectly fine for well-trained and trusted employees, it may need to be restricted based on their expertise or job description. This concept is known as role-based access control (RBAC).
ArubaOS-CX switches are user-groupApply RBAC by defining user groups. Manually configure each group by individually specifying allowable switch commands. ArubaOS-CX switches have three user groups defined by default.
- Administrators
- Auditors
- Operators
The above three user-groups cannot be deleted or modified separately.
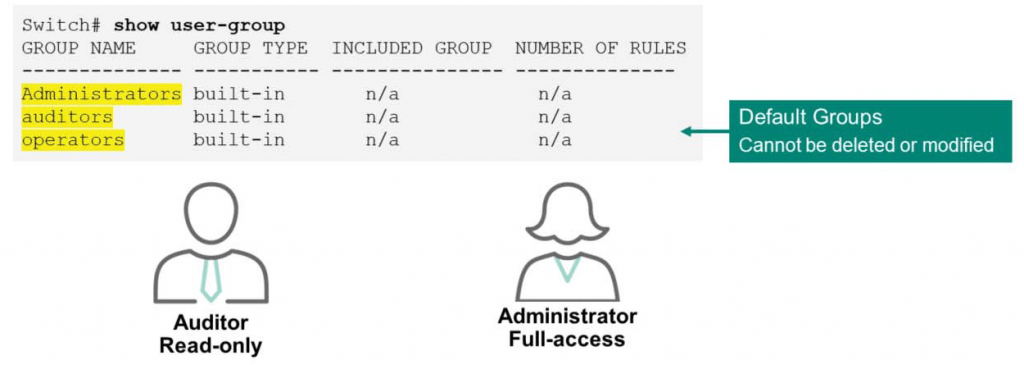
“You can check this information using the ”show user-group” command.
RBAC configuration
Here's how to configure a new user-group:.
Switch(config)# user-group <group name>Map user accounts to the newly created groups.
Switch(config)# user <username> group <groupname> password plaintext <password>If you want to limit the commands available to a given group, use a rule like this:.
Switch(config)# user-group monitoring
Switch(config-usr-grp-monitoring)# permit cli command "<command>"
So, let's create a group called "monitoring" that can only use the commands "show version" and "show interface 1/1/1".
[Example]
Switch(config)# user-group monitoring Switch(config-usr-grp-monitoring)# 10 permit cli command "show version" Switch(config-usr-grp-monitoring)# 20 permit cli command "show interface 1/1/1""
RADIUS-based management authentication
For authentication, some administrators configure local account information on each switch. While this approach works well in small environments, it becomes a significant burden for administrators as the network grows. For example, if there are 100 network devices, the problem of creating and managing 100 accounts becomes a problem.
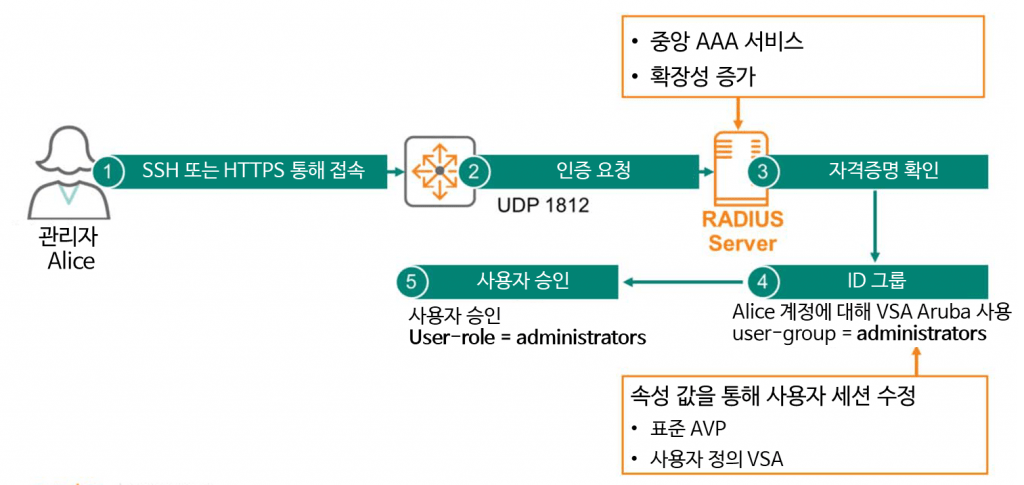
So many people use a centralized management method through the AAA service of a RADIUS (Remote Authentication Dial-In User Service) server. Hundreds and thousands of devices RADIUS protocol (UDP port 1812)Use to access the credential store located within the central RADIUS server.
A user or administrator asks the switch if they can access it, and the switch asks the RADIUS server for this information.
“A user named Alice came in with the password Secret123. Should I grant access?” Something like that.
When the RADIUS server receives such a request, it checks the credentials in its database and sends them to the switch. ACCEPT or REJECT You will be sent a message.
Additionally, the RADIUS server can forward messages containing several attribute values. These attribute values are like "notes" or "remarks" that can modify how the connection session is conducted.
For example, when a user named Alice sends credentials to a RADIUS server to log in to a switch, the server verifies these credentials and sends an ACCEPT message. When sending the message, you can add an attribute value to the ArubaOS-CX switch to include Alice in the "Administrator" user group.
One of the reasons the RADIUS standard has become so popular is because it was designed to be customizable by equipment manufacturers and suppliers using vendor-specific attributes (VSAs).
Aruba has created VSAs specifically for Aruba products to improve usability and functionality, and by default they use standard attributes called Attribute Value Pairs (AVPs).
Custom VSAs must be manually added to the RADIUS server. However, Aruba ClearPassAruba VSA can be used as a powerful RADIUS server with no additional add-ons required.
SNMP – Simple Network Management Protocol
SNMP is a Layer 7 (Application Layer) protocol defined in RFC 1157 for exchanging management information between network devices. It is primarily used to monitor, manage, and configure network elements, regardless of manufacturer. The SNMP architecture is illustrated below.
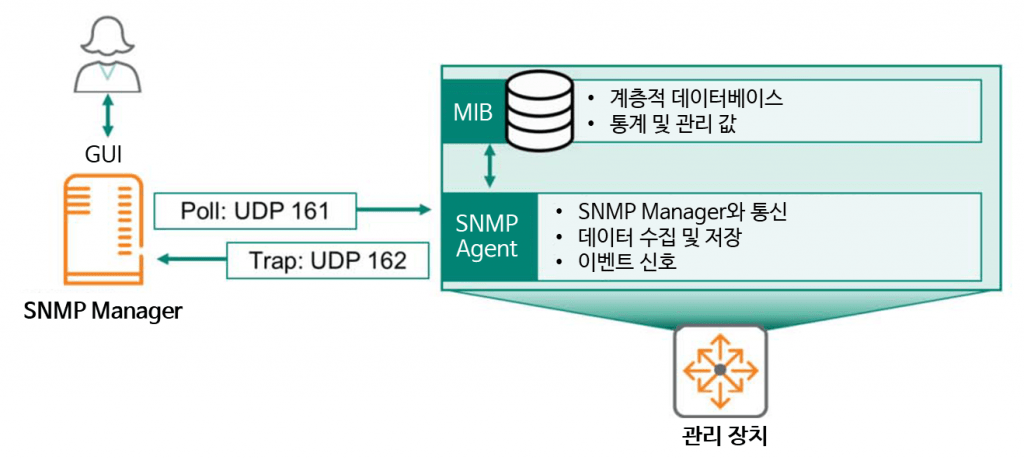
SNMP Manageris a server configured specifically to communicate with SNMP agents. It often has a GUI interface, allowing administrators to view and change values for multiple network devices from a single interface. This manager uses several message types to collect and change values for network devices.
- Agent Query
- Get response values from agents
- Set specific values for the agent
- Acknowledge asynchronous events from agents
A management device refers to any network device, such as a router, switch, firewall, wireless controller, or access point, that is centrally monitored, managed, and configured. These management devices internally feature two main SNMP components.
- SNMP AgentIt collects information about the device's configuration and status and communicates with the SNMP Manager. It stores and retrieves this information in the Management Information Base (MIB).
- MIBIt stores device status, numerical values, and configuration information in a hierarchical database. This information is exchanged through communication between the SNMP Manager and the managed devices.
Typically, SNMP managers use a mechanism called "Pull" to communicate with agents. When a manager wants to receive information from a managed device, it requests it using simple commands such as GET, GET NEXT, and GET BULK. It also uses a command called SET when it needs to modify a device. This communication uses UDP 161.
“An exception to the "pull" mechanism is when the managed device needs to send critical information immediately, without waiting for the Manager's polling period. For example, this could be when CPU usage is so high that it's dangerous.
In this case, the management device will “push” the information directly to the Manager using SNMP Traps, which use UDP 162.
SNMP version
SNMP has three versions depending on the security level.
- SNMPv1 (Version 1): The first version of the SNMP protocol uses a community-based security mechanism. The "community string" is like a simple pre-shared passcode. If a managed device has a community string of "public," any SNMP manager can access the device's Agent MIB as long as the community string is set to "public.".
- SNMPv2c (Version 2c): This is a revised protocol, improving upon SNMPv1. Improvements include protocol packet types, transfer mappings, and MIB structure elements. It uses the same community-based security mechanism as SNMPv1.
- SNMPv3 (Version 3): Provides higher security, including message integrity, authentication, and encryption.
Configuring SNMPv2c in ArubaOS-CX is as simple as:.
Switch(config)# snmp-server community <community-string>
Switch(config)# snmp-server vrf <vrf-name>
※ reference: By default, ArubaOS-CX switches have public as the SNMP read-only community. No write-only community is set, so access is not possible.
ArubaOS-CX switches are read-only by default.
Configuration file management
ArubaOS-CX switches use RAM and Flash memory to store configuration files.
You need to understand the characteristics of RAM and Flash memory to understand how configuration files are stored.
- RAM memory: It is used to store the current configuration information (running-config) on the device. Since RAM is not permanent storage, the contents stored in RAM can be lost when the device is rebooted or power is lost. If you modify running-config and reboot the switch, the changes will be lost.
To check running-config “show running-config”You can check this with the command:. - Flash memory: Used to permanently store configuration information. Contents stored in FLAH memory remain intact even after power is turned off or rebooted. “show startup-config” You can check the saved contents through the command.
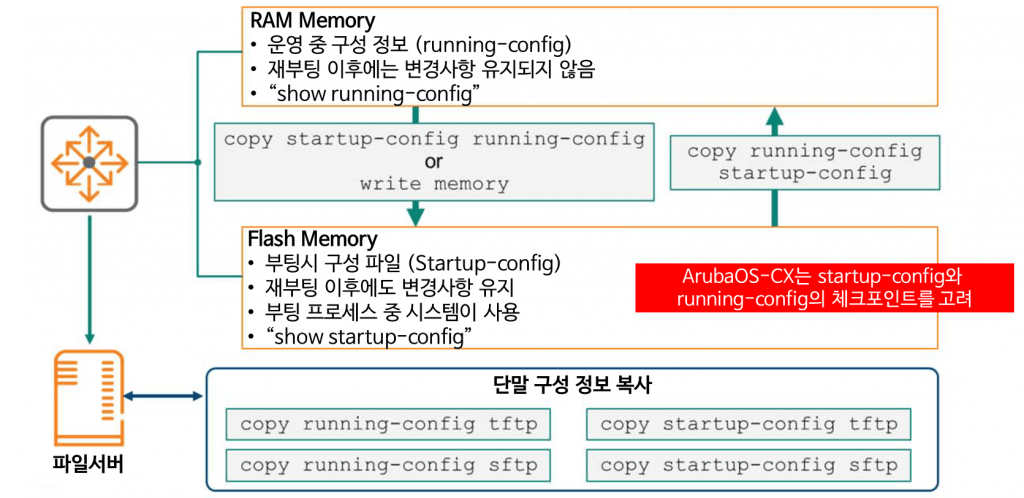
Of course, you can copy the changes reflected in running-config to the startup-config file at any time using the copy command. To permanently save the configuration information of the operating device, “copy running-config startup-config”You can use the command:.
※ reference: “write memory” You can also use the command , which does the same thing.
also, “copy startup-config running-config”You can restore the configuration information in startup-config using the command:.
The best approach is to export the running-config and startup-config files and store them on an external file server. These backups can be extremely helpful in recovering from a catastrophic failure. To export them, enter the following command:.
Switch# copy {startup-config | running-config} {tftp:// | sftp://USER@}{IP | HOST}[:PORT][;blocksize=VAL]/FILEBecause the command is complex, let's look at an example of copying the running-config to a TFTP server called 10.253.1.21.
Switch# copy running-config tftp://10.253.1.21/switch_config.cfgAdditionally, ArubaOS-CX switches can copy files to USB devices. You can save configuration information to a USB memory stick by connecting it directly to the switch and using the command below.
Switch# copy {running-config | startup-config} usb:/fileCheckpoint
We previously learned that using the copy command to save a configuration file allows for immediate recovery of configuration information in the event of an administrator error or power failure. However, these backup files do not contain any data regarding the network process state. Therefore, a new approach is needed for true recovery.
A checkpoint is a snapshot of an operating switch. When this snapshot is created, it includes the running configuration information (running-config) and related metadata. Therefore, administrators can use checkpoints to apply the backed-up switch configuration information whenever necessary, such as reverting to a previous state. Checkpoints have a highly flexible structure, allowing them to be applied to other switches of the same model.
Checkpoint has two modes:.
- The system generates: A checkpoint is automatically created when a configuration change is made and there is no activity for 5 minutes. By default, a checkpoint is created every 5 minutes (300 seconds).
- Checkpoint is CP It is generated in the format of .
- User-generated: It is created manually by the administrator.
To create a checkpoint, use the command called copy.
Switch# copy {running-config | startup-config} checkpoint <checkpoint-name>To check the checkpoint list, use the show command as follows.
Switch# show checkpoint list allTo revert the switch to a specific checkpoint, use the following command:.
Switch# copy checkpoint <checkpoint-name> {running-config | startup-config}※ reference: You can export checkpoints to an external server.
In addition, you can restore the configuration information saved in the checkpoint running-config using the rollback command.
Switch# checkpoint rollback <checkpoint-name>※reference: The rollback command performs the same function as the copy checkpoint running-config command.
Checkpoint Auto Mode
Occasionally, after applying a switch configuration, the switch becomes locked out, rendering it inaccessible. In such cases, the only solution is to connect directly locally using the console port and clear the problematic configuration.
However, using checkpoint auto mode can solve this problem more conveniently.
This solution incorporates a timer. After the system creates a checkpoint of the current state, the administrator makes the desired configuration changes and applies them to the system. If there are no connection issues after application, the administrator confirms the configuration changes. If the administrator fails to confirm within the specified timer, the switch automatically reverts to the checkpoint snapshot.
Use auto mode with the following command:.
Switch# checkpoint auto <minutes>
Switch# checkpoint auto confirm
Here are some practical usage examples:.
Switch# checkpoint auto 20
Auto checkpoint mode expires in 20 minute(s)
Switch#
WARNING Please "checkpoint auto confirm" within 2 minutes
Switch# checkpoint auto confirm
checkpoint AUTO20170801011154 created
If there is a problem with the configuration and you cannot connect, it will be automatically restored if you do not confirm within the specified time.
Switch# checkpoint auto 20
Auto checkpoint mode expires in 20 minute(s)
Switch#
WARNING Please "checkpoint auto confirm" within 2 minutes
WARNING: Restoring configuration. Do NOT add any new configuration.
Restoration successful
Operating System Image Management
ArubaOS-CX switches have two flash memory modules, or partitions, to store software image files. AOS-CX refers to these modules as the primary image and the secondary image.
Having two Flash memory locations makes managing the switch easier and helps with firmware upgrade planning. For example, you can download a new firmware image to an unused Flash memory location and then configure the switch to boot from the new firmware image during maintenance.
“You can use the ”show image” command to check the software information of the current Primary and Secondary images.
Switch# show image
----------------------------------------------------------------------- ArubaOS-CX Primary Image ----------------------------------------------------------------------- Version: GL.10.04.0003 Size: 415MB Date: 2019-10-31 12:33:52 PDT SHA-256: 794336ee0b1f941aac421bec5333f16b4ebbcd1f4035a388d3b79aa ----------------------------------------------------------------------- ArubaOS-CX Secondary Image <<<<< >>>>> Default Image : Primary ----------------------------------------------------------------------- Management Module 1/1 (Active) ----------------------------------------------------------------------- Active Image : primary Service OS Version : GL.01.05.0002 BIOS Version : GL-01-0013
Operating System Image Management Access
Administrators can update the switch using the CLI or GUI.
In CLI, use the copy command.
Switch# copy {tftp://|sftp://USER@}{IP|HOST}[:PORT][;blocksize=VAL]/FILE {primary | secondary}Let's look at an example of copying an image file called GL.10.04.0003.swi to a TFTP server with an IP address of 10.253.1.21.
Switch# copy tftp://10.253.1.23/GL.10.04.0003.swi primaryHere's how to use Secure FTP with an account named admin:.
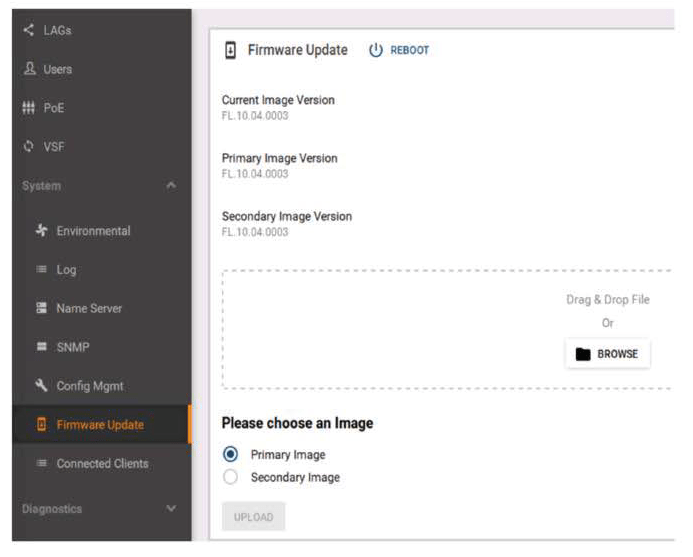
Switch# copy sftp://admin@10.253.1.21/GL.10.04.0003.swi primaryUsing the GUI is much simpler. After accessing the GUI page via HTTPS, go to System → Firmware Update. Then, locate the image file downloaded to your PC, select the Flash partition, and upload it.
Password Recovery Process
If you have forgotten your credentials (account and password) to log in to your Switch or are repeatedly failing to log in, you will need to follow the password recovery process below.
1. Connect to the switch via the console port.
2. Turn the switch off and on.
3. When the system screen appears, select menu number 0. Service OS console Select an option.
Boot Profiles: 0. Service OS Console 1. Primary Software Image [FL.10.04.0003] 2. Secondary Software Image [FL.10.04.0003] Select profile(primary): 04. Log in as user admin without entering a password.
5. After logging in passwordSet a new password for the admin account using the command:.
ServiceOS login: admin
SVOS> password
Enter password: ********
Confirm password: ********
6. boot Enter the command.
7. Log in with the admin account using the password you set in step 5.
Factory Default
“erase all zeroize“The "" command will reset the switch to its factory default state. You'll be prompted with relevant information before the factory reset process begins. Once complete, the switch will reboot into the primary image with the factory default configuration.
Switch(config)# erase all zeroize
This will securely erase all customer data and reset the switch to factory defaults. This will initiate a reboot and render the switch unavailable until the zeroization is complete. This should take several minutes to one hour to complete. Continue (y/n)? y
The system is going down for zeroization.
“erase-startup” The command clears the startup checkpoint. The difference is that the zeroize command clears all checkpoints.
We've covered how to maintain ArubaOS-CX switches.
While building and configuring your network is important, maintaining the environment you build is even more important.
Please carefully review the commands required to monitor and manage the current environment to ensure it remains safe and operate a secure network environment.
This concludes the 40-session ACSA training.
Some of the content included in the actual ACSA training will be omitted and some will be conveyed through other postings. Lecture materials or official textbooks provided by ArubaWe recommend that you watch it together.