Deploying data center switches may seem similar to installing campus switches, but data centers have their own unique characteristics.
In particular, data center switches are prepared in advance before being brought into the field. ‘Staging’ It often goes through a process.
Today we will learn what switch staging is and what are the two main Provisioning methodLet's learn more about it.
Switch Provisioning: Challenges and Options
Provisioning switches for data centers can present several challenges.
There are several ways to provision AOS-CX switches, allowing network engineers to choose the method that best suits their needs and scenarios. Let's explore these options together!
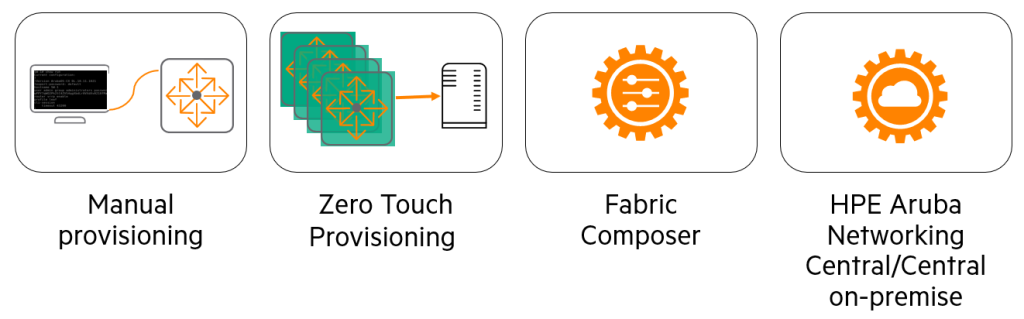
Manual Provisioning: The Traditional Work Method of Network Engineers
Manual provisioning is the process of manually configuring one or more switches, the same way network engineers have done for decades.
In this process, the network engineer Physical accessMust do.
You need to go directly to the device and connect to the console port or management port. Once connected, you can check the device status. Verification taskIt starts from.
Check the status of the power supply and fans, and carefully inspect them for any unexpected output or errors.
Once the equipment verification is complete, the switch software will be updated to the latest version or a customer-approved version. UpdateYou can do it.
Only after completing equipment testing and updates, engineers can switch Configuration tasksYou can start.
Although many engineers create and use their own setup scripts, this whole process is still A task that requires a lot of manpower and timeno see.
ZTP (Zero Touch Provisioning): Automated switch configuration
ZTP eliminates the work of engineers updating switches and applying settings. Automate and speed up It is a technology that helps you process it.
Using ZTP, AOS-CX switches shipped from the factory in a default configuration receive instructions from a DHCP server to automatically download specific software versions and configuration files from a remote server.
This process eliminates the need for network administrators to manually connect to each switch to configure it and update its software.
This can significantly reduce the time and effort required to set up the switch.
We'll talk more about ZTP later.
HPE Aruba Networking Fabric Composer: Revolutionary Data Center Network Management
HPE Aruba Networking Fabric Composer works with AOS-CX switches to create switch and network fabric Seamlessly optimize provisioning (setup and deployment)It is a solution designed to enable network administrators to manage data center switches through a series of interactive, automated workflows. Easy provisioningHelps you do so.
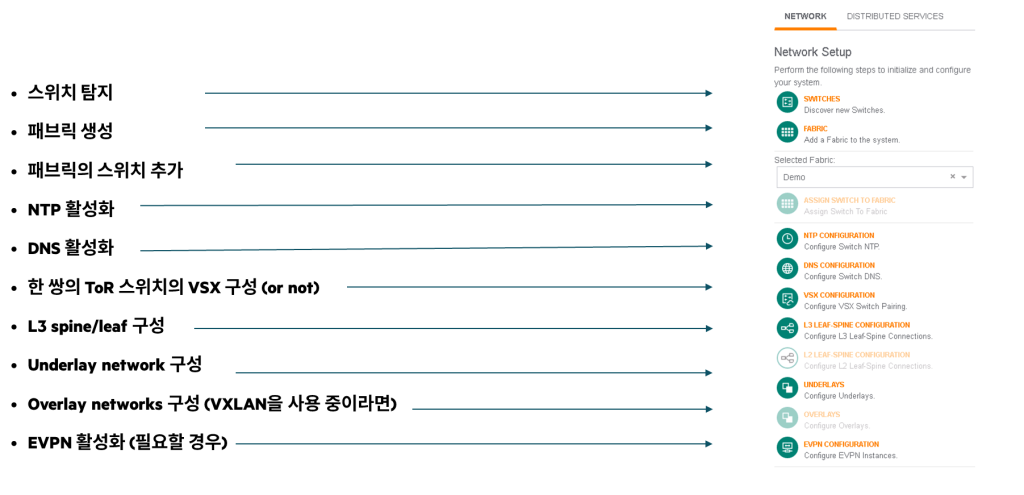
HPE Aruba Networking Fabric Composer allows individual switches to be Orchestrated as a single entity within a single “fabric” topologyThus, simplifying daily operations and troubleshooting.
This solution is Deep IT ecosystem integrationBy supporting administrators Manage, provision, and visualize your entire end-to-end network.It allows you to do so. The intuitive HTML5-based user interface allows you to Automatically document real-time mapsPlease do it.
This map provides at-a-glance visibility into VM-to-host networking, specific switch ports, and even Virtual Switch Extensions (VSX) and spine-leaf connectivity via network views. A robust set of APIs and tight integration with various third-party data center automation stacks provide Smooth setup and operation experienceIt provides.
HPE Aruba Networking Central: The Future of Cloud-Based Network Management
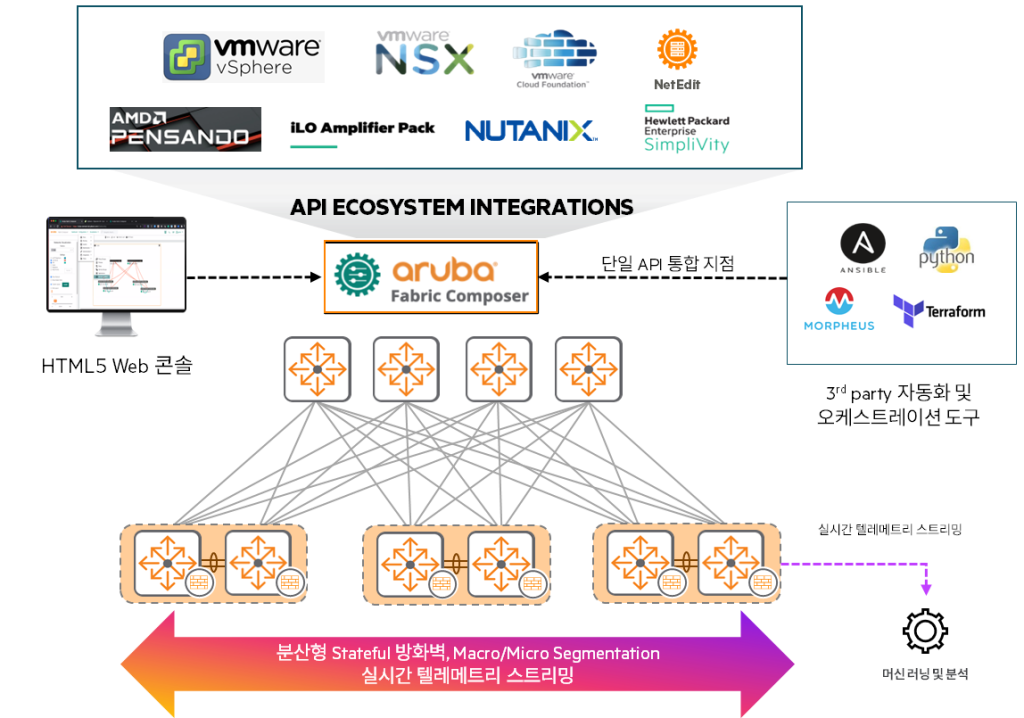
HPE Aruba Networking Centralprovides unparalleled simplicity to today's IT operations. Powerful cloud-managed networking solutionno see.
As the management and orchestration console for the HPE Aruba Networking Edge Services Platform (ESP), it manages wired and wireless LANs, WANs, and VPNs across campus, branch, remote, and data center locations. A single point of control that oversees all infrastructure environmentsIt provides.

This solution includes AI-powered analytics, end-to-end orchestration and automation, and advanced security capabilities.This is built in.
Bring greater efficiency to routine maintenance activities, including real-time upgrades, powerful reporting capabilities, and live chat support.
To onboard (register) a new switch to the platform ZTP Options are available, giving you greater agility when adding new switches and devices.
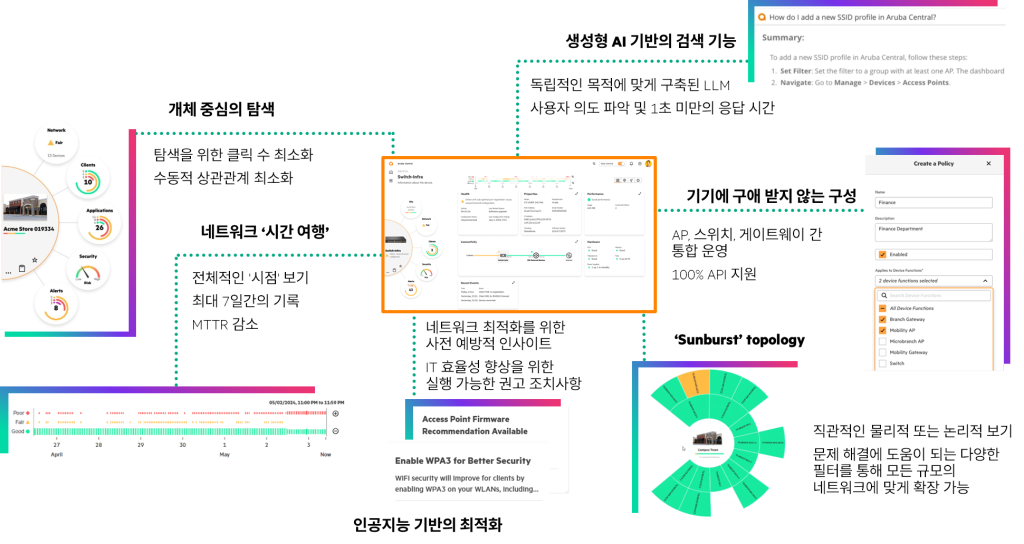
Central is Cloud-native microservices architecture, meeting the scalability and resilience requirements of enterprises.
HPE Aruba Networking Central On-Premises (on-premise version)
On-Premises OptionCustomers who do not have internet access, for example: Industries with very high security levels, such as military facilities or banksis provided for.
Leverage Central's powerful management capabilities even in environments where uploading data to the cloud is challenging or external connectivity is limited.
In summary, HPE Aruba Networking Central is a comprehensive solution that simplifies and automates complex network management with the flexibility of the cloud and AI-driven intelligence, while also offering on-premises deployment options for sensitive environments to meet the diverse needs of customers.
Data Center Switch Staging: The Smart Way to Prepare Before Installation
Staging, the process of preparing data center switches before actual installation, is crucial and is considered an industry best practice. Let's explore what switch staging is and what its benefits are.
Staging vs. On-site Provisioning
Switch staging, or pre-provisioning, this process is performed before the switch is installed in the data center. Pre-unpacking, testing, upgrading software, and completing setup, he says.
Many companies (organizations) consider this process a mandatory step and it is recommended as a best practice in data center environments.
Staging is usually done before the actual installation date. Previously, a separate space outside the data centerIt is conducted in .
Some data centers have a separate Onboarding/Provisioning Room where staging takes place.
Advantages of staging:
- Preemptively detect hardware problems: Testing new equipment in advance can help reduce problems that may arise on installation day.
- Check the components: You can check that all necessary parts have arrived/been purchased properly before installation.
- Software updates and settings: You can update your switch to the latest version in advance and apply the necessary settings in advance.
Some organizations require that they be managed securely after deployment. Just minimal settings There are cases where you have to do it in advance.
But according to company regulations All settings perfectlySometimes it is completed in advance.
Non-staged switches, on the other hand, are often provisioned directly at the installation site.
It has the same goal as pre-provisioning, but usually During maintenance periods or scheduled installation times It is done.
Advantages of on-site provisioning:
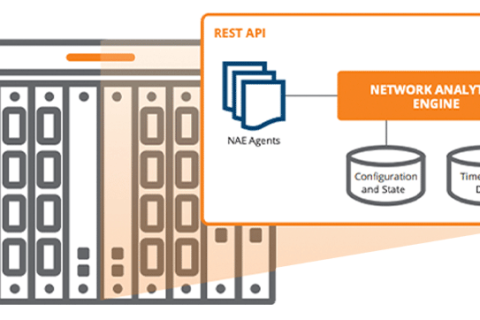
- Once the network environment is ready, Central, Fabric Composer, Network Analytics EngineThe advantage is that you can upgrade and configure new switches using network configuration and orchestration tools such as .
Why do we do 'staging' to prepare data center switches in advance?
Security is a very important part of any data center.
Logical security such as firewalls are important, but, Physical securityIt is also an important part.
Not only does it control who can enter the data center space, but it also ensures that authorized personnel are Reducing the time spent insideIt is also important.
Switch staging dramatically reduces the time it takes to deploy new switches.
It takes time to test, update, and configure switches in the data center. Reduce hours of work to just minutesI will make you do it.
These few minutes are usually all it takes to install the switches in the rack, power them on, and connect the cables.
Additionally, staging is for network administrators. A final chance to check for faulty devices, missing parts or components.in the file.
This prevents the project from being impacted, hindering the achievement of desired goals and causing delays.
General steps for switch staging
A typical switch staging involves the following tasks:

Hardware assembly and validation
- target: What may happen during transportation physical damageMake sure this is there and all Whether the components arrived properly I confirm.
- Bill of Materials (BoM) and ensure that everything matches the project design.
- Additional considerations: Appropriate switch Air flow direction (depending on data center cooling design)과 power supply It is important to check that the power supply (including redundancy, AC or DC power, and power cord) fits your data center design.
Finally, make sure you have all the necessary cables (DAC) and connectors (transceiver). - execution: Once all checks are complete, assemble the switch and install the switch PSU (power supply unit), fan tray, transceiver, and cables.
Hardware test
After assembling the switch, power it on and check the CLI (Command Line Interface) or status LED. You should pay attention to the error message.
When the switch is powered on, you should check the device status.
There are many commands you can use to check the status of a switch, but one particularly useful command is show environmentno see.
This command shows fans, LEDs, power supplies, airflow, and temperatures.
Software upgrade
Once the switch is ready and activated, it's time to install the appropriate software release.
HPE is committed to ensuring the latest features in its new switches. We recommend installing the latest software.do.
However, in some businesses and high-security environments, certain, Approved Software ReleaseYou may also request:.
Before performing any upgrades Software Release NotesIt is also a good idea to check.
Switch configuration
During pre-provisioning (staging), the switch is configured with management, switching, routing, and security configurations. Complete setupYou can receive it.
Some high-security environments take a different approach.
Network engineers responsible for pre-provisioning are responsible for the necessary security and remote management. Minimal setupYou will be instructed to perform the following steps and onboard (register) the switch to the management platform. This is to prevent leakage of network design and configuration information.
Once the switch is installed, the data center network team takes over, changes the credentials, and pushes (applies) the device configuration.
Implementation
Once the pre-provisioning process is complete, it's time to implement the solution in the field.
In an active data center, Be sure to plan a maintenance windowYou have to remember that you have to do it.
Since all switches have been tested and configured, this maintenance period MinimizeYou can do it.
Once the device is installed in the rack, ensure that the configuration and connections are correct. Verify once againMust do.
As such, staging is a key process for maximizing the efficiency, security, and stability of data center switch deployments.
Manual Switch Provisioning: A simple but time-consuming setup method.
The key advantage of manual provisioning is that Simplicityis in.
No special tools or software are required, and you can even do it with just your smartphone.
Initial Setup – Connection Method
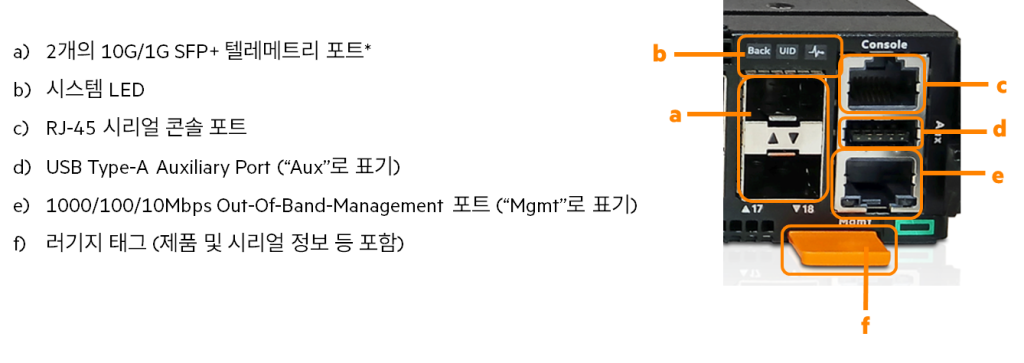
There are three options available for initial setup of the AOS-CX switch:
Console port
All AOS-CX switches have a console port, but keep in mind that its shape may vary depending on the switch model.
For example, the CX 6200 series and CX 6300 series USB-C console portUse .
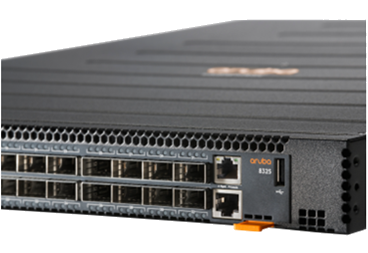
On the other hand, the CX 8×00 series, CX 9300 series, and Pensando-based CX 10000 series RJ45 connectionUse .
It can be connected via an RJ45-DB9 console cable.
To connect to the console port, follow the steps below:.
- Use a console cable to connect the console port on the switch to the serial port on your computer.
- Start terminal emulation software (Putty) on your computer and configure a new serial session with the following settings:
- Speed: 115,200 bps
- Data bits: 8
- Stop bits: 1
- Parity: None
- Flow control: None
- Starts a terminal emulation session.
- Press Enter once. If the connection is successful, a login prompt will appear.
Management port
AOS-CX switches are equipped with an Ethernet management interface that can be used for remote switch management.
In data centers, this interface is often OOBM Networkis connected to the management port. The management port can also be used for initial switch setup.
By default, the management interface is set to automatically obtain an IP address from a DHCP server and SSH support is enabled.
The procedure for connecting via the management port is as follows:.
- If your network does not have a DHCP server, you must manually configure a static IP address on the management interface.
- To connect to the switch, connect the management port to your network using an Ethernet cable.
- The computer is also connected to the same network using an Ethernet cable.
- Then start your SSH client software and configure a new session using the address assigned to the management interface.
- If the management interface is set to act as a DHCP client, check the IP address assigned to the management interface from the DHCP server.
- Start the session. If the connection is successful, a login prompt will appear.
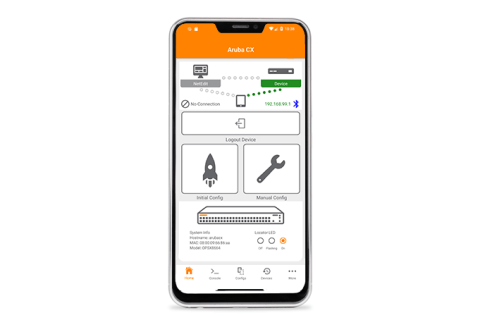
CX Mobile App (Aruba CX Mobile App)
CX Mobile Appis an easy way to perform initial switch configuration.
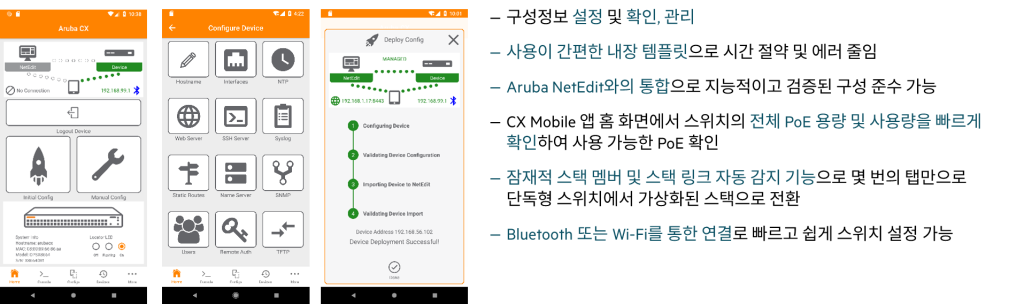
Using this app for Android and Apple iOS, network administrators can configure management ports, change hostnames, configure switch stacks, and more, all from their smartphones.
Terms of Use: To use the CX mobile app, you need to connect a Bluetooth dongle to the USB-A port on your Switch.
Manual provisioning steps
Once connected to the switch, it's now time to provision it.
The first step is to ensure that all switch hardware is functional and ready.
Check the power supply, fans, management module (for chassis switches), and transceivers.
During manual provisioning, you must update the switch software and configure the switch.
Manual provisioning is Time-consuming taskno see.
To optimize this process Write a pre-configuration script and download the necessary software in advance.It's a good idea to do so.
Manual provisioning is suitable for basic setups, but always keep in mind that it can be time-consuming and labor-intensive in large-scale environments.
ZTP (Zero Touch Provisioning): The Complete Guide to Automated Data Center Switch Configuration
ZTP is a technology that allows network administrators to automatically configure switches to factory default settings without being present on site.
When the switch boots, ZTP automatically provisions the switch by downloading and installing firmware files, configuration files, or both.
ZTP (Zero Touch Provisioning) DHCP Workflow
While the ZTP process may seem simple from a network administrator's perspective, it involves a complex, multi-step process internally.
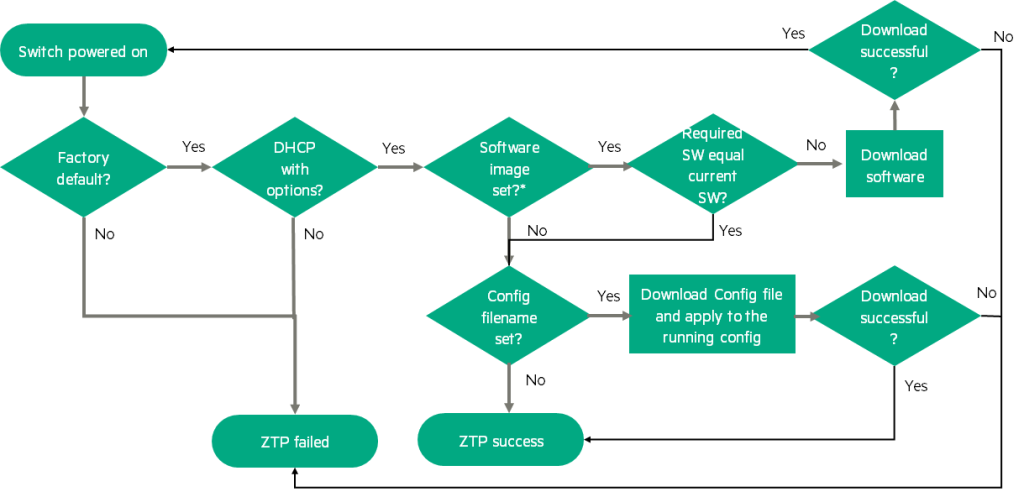
ZTP operation starts
The switch When booting to factory default settings The ZTP task begins.
If ZTP detects that the switch configuration is different from the factory default settings, the ZTP operation is terminated immediately.
DHCP Discovery
The switch sends a DHCP Discovery request on the management port.
The switch will either listen for DHCP options indefinitely or wait until the running configuration is modified.
If a DHCP IP address is received but DHCP options are not received, the switch will terminate the ZTP operation before 1 more minute I'll wait.
ZTP Termination and Retry
There is no automatic retry when a ZTP task completes.
To try again, boot the switch to factory default settings, manually configure the switch at the installation site, or, ztp force-provision You can use a CLI command to force the ZTP process to be triggered, overriding the currently running configuration.
force-provisionWhen this is enabled, a new DHCP request will be sent from the switch. force-provisionDisabling it will not stop DHCP that is already in progress., force-provisionOnly the switch setting status is changed.
force-provisionIf ZTP fails in this enabled state, there is no automatic retry.
To retry, clear the current ZTP state and send a new DHCP request. ztp force-provisionDisable(no ztp force-provision) and reactivate it(ztp force-provision) must be done. ztp force-provisionIf this switch is already enabled, re-enabling it will do nothing.
If your DHCP server is configured to provide both ZTP images and configuration options, and your switch has a non-default startup configuration, ztp force-provisionIt is recommended to clear any non-default startup configurations before triggering.
When the image is downloaded via ZTP, the switch will reboot once the image download is complete. ztp force-provision ZTP is entering a failed state due to lost settings. To continue the process, ztp force-provisionYou need to re-enable it.
DHCP server response:
The DHCP server responds with an Offer containing the following:
- IPv4 address of the TFTP server
- One or both of the following:
Name of software image file / Name of settings file
- Central location (optional), including the shared token value of the Central on-premises server
- HTTP proxy location (optional)
Download and boot the software image:
When a software image file is provided, ZTP downloads the image file from the TFTP server to the switch.
If the current switch image and the downloaded software image versions do not match, the switch will boot with the downloaded image.
If the image upgrade fails, the switch retains the original software image and the ZTP operation terminates with a failed status.
If the image upgrade is successful, the switch will reboot and the ZTP operation will resume.
Since the downloaded image file matches the image file installed on the switch, the ZTP task continues to check if the configuration file is provided.
Download and apply the configuration file:
When a configuration file is provided, ZTP downloads the configuration file. running-configCopy to and then switch to startup-configCopy to .
If the startup configuration update fails, the switch will be reset to factory defaults. running-configand the ZTP operation will terminate with a failed status.
If the copy operation fails, the ZTP operation ends with a failed status.
If the copy operation is successful, the ZTP operation ends successfully.
ZTP (Zero Touch Provisioning) DHCP Pre-Preparation Tasks
Provisioning switches using ZTP provides agility and reduces the time required to provision new switches.
However, you need to perform some preparation steps beforehand to ensure that the new switch can receive the software and configuration files.
- Configuring the TFTP server and DHCP server: You need to configure a TFTP server and a DHCP server. The DHCP server provides the IP address, the TFTP server IP address, and the names of the software and configuration files to be downloaded via DHCP options.
- Set DHCP server options: The DHCP server must be configured with DHCP options 43, 66, 67 and a series of sub-options so that the switch can learn the TFTP server IP address and the file name to download from the DHCP server.
- Prepare your files: Once the DHCP server is configured, you must download the desired software version from ASP and place it in a "shared folder" on the TFTP server. You must also create a configuration file for each switch and place it in the TFTP server's shared folder.
How ZTP Works with DHCP (Summary)
By default, the factory default AOS-CX switch is configured as a DHCP client on the management interface.
When the switch is powered on, it sends out a DHCP discovery packet.
When the DHCP server responds to the switch, the switch checks to see if additional options, such as 43, 66, or 67, were sent.
Once verification is complete, the switch uses this information to connect to the TFTP server.
- Firmware Download: First, when the DHCP server sends the software name, the switch downloads the new firmware and reboots.
- Apply the settings file: If the DHCP server does not send the software name or the switch already has the same software version, the switch will request the configuration file and configure it.
running-config및startup-configApply to.
Supported DHCP Options
- 43 – Vendor Specific Information
- 43 Sub-option 144 – Name of the settings file
- 43 Sub-option 145 – Name of the firmware image file
- 43 Sub-option 146 – FQDN or IPv4 address of the Central on-premises server
- 43 Sub-option 148 – FQDN or IPv4 address of the HTTP proxy
- 60 – Vendor Class Identifier (VCI)
- 66 – IPv4 address of the TFTP server (Host naming is not supported.)
- 67 – Name of the settings file (Option 43 sub-option 144 takes precedence over this option.)
A configuration file is a text file or JSON file that configures the start and run of the switch after the ZTP operation is completed.
Configuration can be in CLI or JSON format.
ZTP is a powerful feature that can significantly save time and effort by automating data center switch deployment.
However, successful ZTP requires pre-configuration of DHCP and TFTP servers and accurate file preparation.
Installing and deploying new switches and connecting them to your production network is a daunting task.
Staging is crucial to identify potential issues in advance and reduce time and risk.
This staging process allows you to check the switch provisioning process and significantly reduce the time required.
As data centers grow in size, manual provisioning processes are becoming less and less common.
We are increasingly leveraging automated provisioning options like ZTP and tools like Central and Fabric Composer.
So save time by learning how to manage, orchestrate, and provision switches using various software.