In the last post, we looked at the types of licenses in AOS 8.
This time, we'll look at how to manage and activate this license.
Central License Management
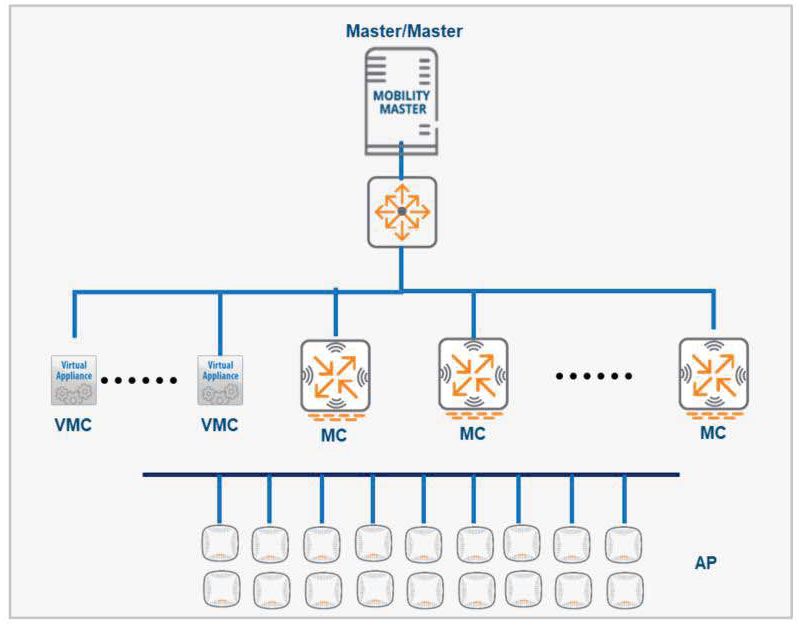
AOS 8.x supports a centrally managed licensing architecture, where a group of managed devices (MDs) share a pool of licenses.
Primary and Backup Mobility Conductor (Mobility Master) can share a single license set, eliminating the need to purchase a separate license for the backup server.
Even if the connection between the management device and the MCR (MM) is lost, the information sent by the MCR (MM) is retained.
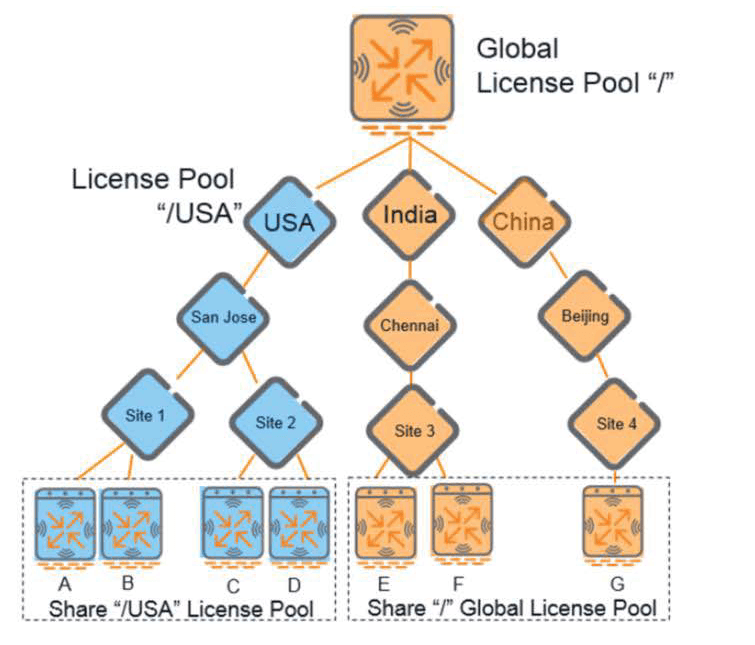
License Pool
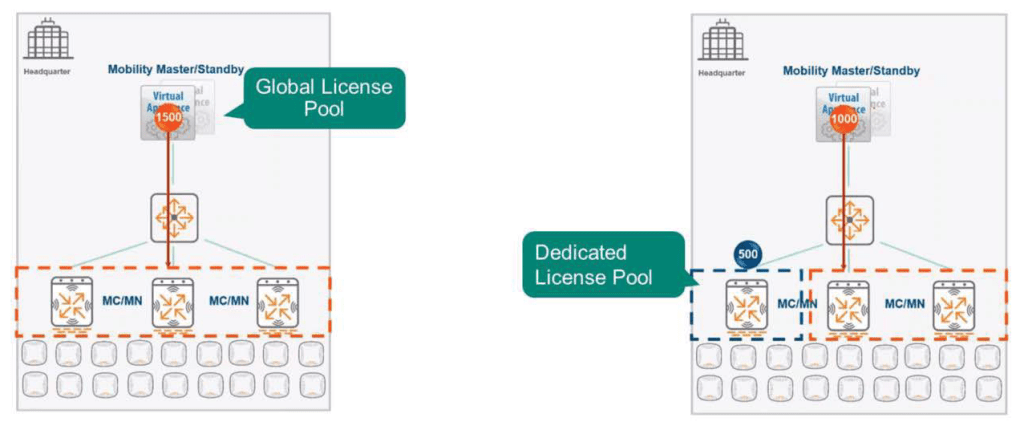
- Global Pool: The Mobility Conductor (MCR) or Mobility Master (MM) distributes licenses to a large number of Management Devices (MDs) using a license pool. By default, all Management Devices (MDs) connected to a Mobility Conductor (Mobility Master) share a single global pool of all shareable licenses added to the MCR (MM).
- Dedicated/Customized Pool: AOS can create additional license pools on the configuration node. This prevents managed device (MD) groups below that configuration level from sharing licenses with other groups.
Generate license key
Starting with AOS 8.0, the way to install a license in a Mobility Conductor (Mobility Master) environment is to install it directly on the Mobility Conductor or Mobility Master equipment and assign the license to each management device (MD).
Administrators cannot add licenses directly to the Management Device (MD) using the UI.
To generate a license for a Mobility Master installed on a VM or a managed device using the Aruba Software License Management website, you will first need:.
- License Certificate ID available for request through your sales representative or reseller
- VM serial number and ArubaOS password
- Access the Aruba website to generate a license
There are two parts to the migration process from AOS 6 to AOS 8.
- Deploying an existing AOS 6 configuration to AOS 8 using the migration tool
- Existing licenses can be migrated to AOS 8 Mobility Master via MyNetworkingPortal online (or ASP).
License Activation
■ Activate local license pool
It can be activated via the WebUI of Mobility Master (Mobility Conductor).

- After accessing the Web UI of Mobility Master (Mobility Conductor) and selecting the configuration menu in the upper left corner, MMSelect
- Configuration → Licenses Go to item
- In the bottom tab License UsageSelect . Global Licese PoolBy expanding desired groupSelect
- Enable Local License PoolActivate by checking the checkbox
- Select the required license for each license feature and enter the quantity.
■ Activation by license function
It can be activated via the WebUI of Mobility Master (Mobility Conductor).
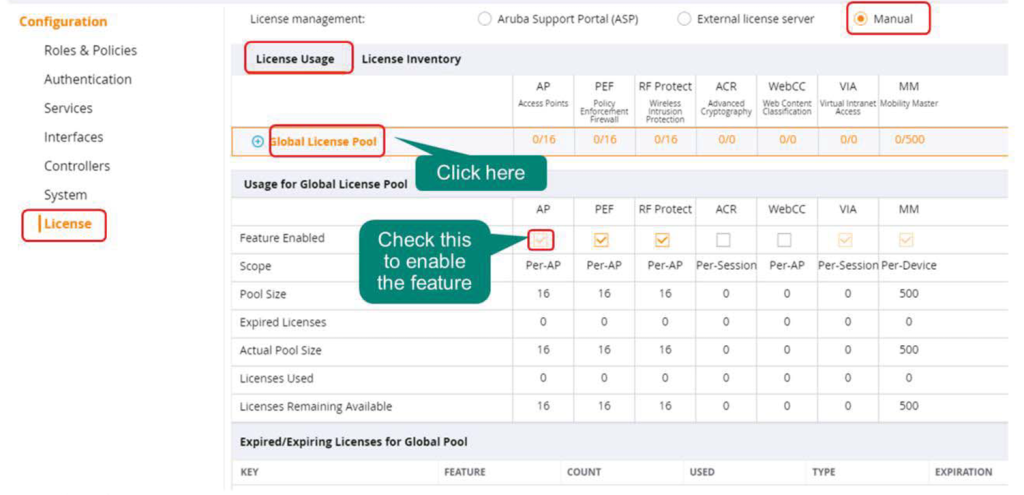
- After accessing the Web UI of Mobility Master (Mobility Conductor) and selecting the configuration menu in the upper left corner, MMSelect
- Configuration → Licenses Go to item
- In the bottom tab License UsageSelect . Global Licese PoolIf you select , Usage for Global License Pool The table appears
※ Do not expand using the (+) button. - Usage for Global License Pool Activate the license features by selecting the checkbox for each license in the table.
■ (Example) Determine the number of licenses required
Before installing AP in a production environment, you must first enter MM and AP licenses.
If 300 APs and 30 MCs (Mobility Controllers) are installed, how many licenses will be required for each?
- MM License = 300(AP) + 30(MC)
- AP License = 300
- PEF License = 300
- RFP License = 300
RFP, WebCC, and PEF licenses may be optional depending on your environment, and AP license is required.
You can check the features of each license in the post below.
Adding and Deleting Licenses
■ Add license
You can add licenses within a shared pool via the WebUI of Mobility Master (Mobility Conductor).
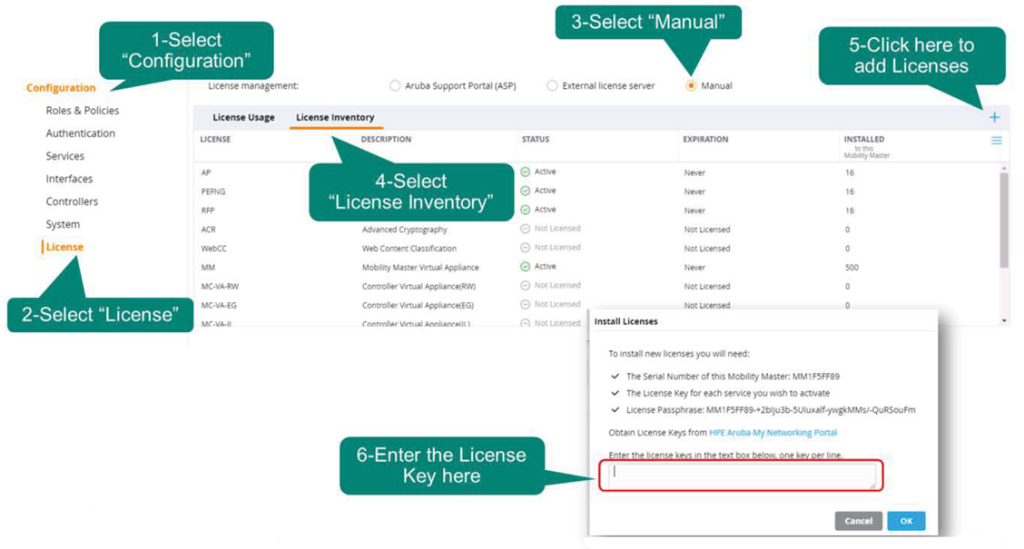
- After accessing the Web UI of Mobility Master (Mobility Conductor) and selecting the configuration menu in the upper left corner, MMSelect
- Configuration → Licenses Go to item
- At the top Manual Select options
- In the bottom tab Licenses InventorySelect
- When you select the + button at the top right of the inventory table, a license installation window will pop up.
- Enter your license serial number in the license installation window – Each license key must be entered on a separate line
- OK Click
■ Delete license
Deleting a license is also possible through the WebUI of Mobility Master (Mobility Conductor).
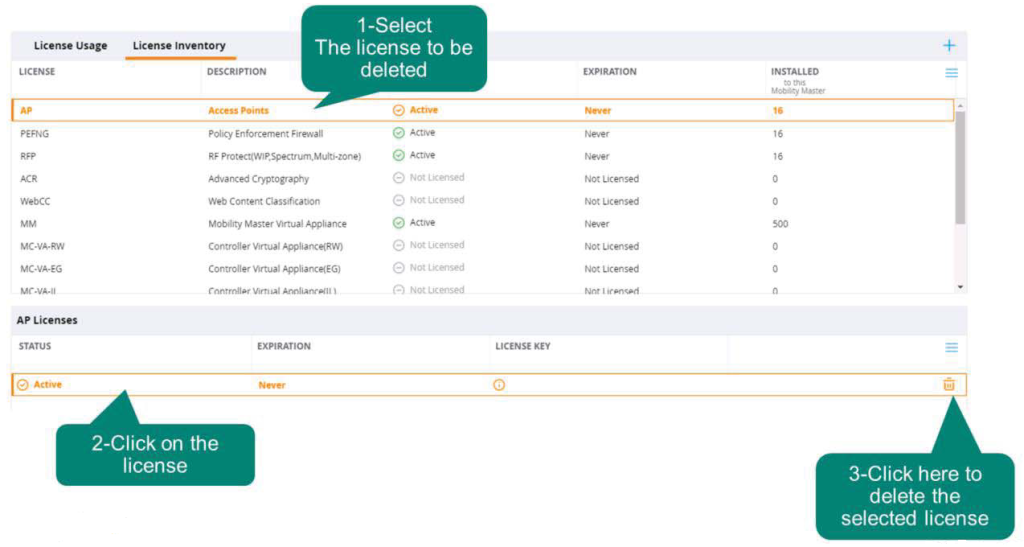
- After accessing the Web UI of Mobility Master (Mobility Conductor) and selecting the configuration menu in the upper left corner, MMSelect
- Configuration → Licenses Go to item
- At the top Manual Select options
- In the bottom tab Licenses InventorySelect
- Select the license you want to delete
- Delete by clicking the delete icon (trash can) in the window at the bottom
This is how to manage licenses in AOS 8. Add/Delete/ActivateI learned how to do it.
In addition, from AOS 8.4 and later, Mobility Master (Mobility Conductor) ASP (Aruba Support Portal) or LMS(License Management Server)Supports the ability to automatically retrieve licenses from .
This means that users no longer need to manually enter their licenses.
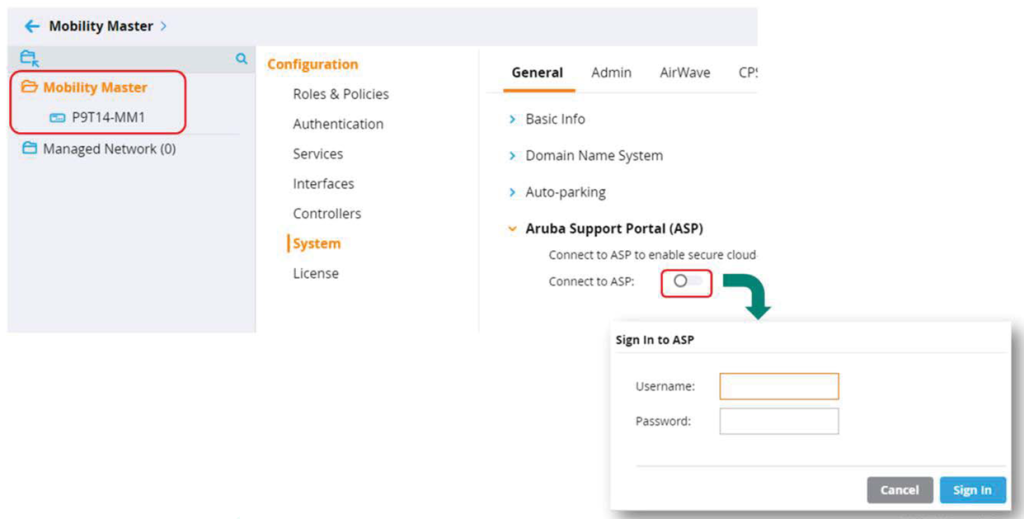
To automatically import licenses, you must do so once via the Mobility Maset WebUI or CLI. ASP You will need to enter your account information in Mobility Master. ASPBefore accessing, users must: ASPYou will need to create an account and onboard at .
In the next lesson, we'll learn how to install and configure Mobility Master.