We already covered routing in our last post.
We looked at how actual packets move across Layer 3 with the IP routing table.
Okay, so let's take a look at what types of routing there are and what protocols there are.
Routing Types in AOS-CX
The routing device makes Layer 3 forwarding decisions based on the optimal path in the IP routing table.
Each entry in the routing table can be populated manually or by a routing protocol.
The types of routing that can exist on a switch in ArubaOS-CX are:.
- Connected
- Local
- Static
- RIPv2
- OSPF
- BGP
Connected & Local items
The following configuration is...
Set an IP address for the SVI (Switching Virtual Interface) for VLAN 1 and assign VLAN 1 to port 1/1/1.
Switch(config)# interface vlan 1
Switch(config-if)# IP address 10.1.1.1/24
Switch(config)# interface 1/1/1
Switch(config-if)# no routing
Switch(config-if)# vlan access 1
The above configuration creates several entries in the routing table.
“You can check this using the command ”show ip route”.
Switch# show ip route
Displaying ipv4 routes selected for forwarding '[x/y]' denotes [distance/metric] 10.1.1.0/24, vrf default via vlan1, [0/0], connected
10.1.1.1/32, vrf default via vlan1, [0/0], local
The first entry in the routing table above, "connected," indicates that the subnet 10.1.1.0/24 is physically connected to the switch. Therefore, no additional next-hop is required to access that network.
The second local entry, /32, represents a single IP address. This means that the previously configured IP address can be used for routing processes within the switch. This could be an SVI for VLAN 1 or a loopback interface.
Static routing
Static routing is required when the destination network is not directly or physically connected to a switch or router and is not advertising its route via a routing protocol such as OSPF.
Static routing manually defines the destination network and the next hop along the route.
Here, the next hop must be directly connected to the device that applies static routing.
In ArubaOS-CX, static routing is established using the ip route command.
Switch(config)# ip route <remote-network/mask> <next-hop> vrf <vrf-id>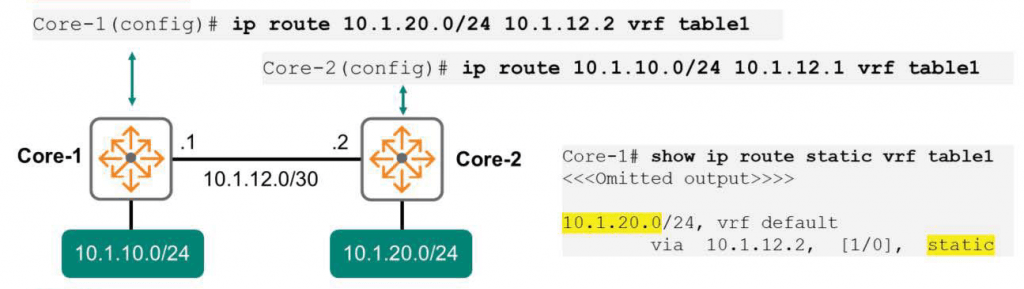
Let's take a look at the picture above.
Let's say an endpoint on the 10.1.10.0 network wants to communicate with another endpoint on the 10.1.20.0 network.
The Core-1 switch has two networks physically connected: 10.1.10.0/24 and 10.1.12.0/30.
However, the Core-1 switch is not physically connected to the 10.1.20.0/24 network. Therefore, manually add the route as follows:.
Core-1(config)# ip route 10.1.20.0/24 10.1.12.2 vrf table1Since communication is bidirectional, static routing is also required on the Core-2 switch to complete the path.
From the Core-2 switch perspective, there are only network route entries for 10.1.12.0/30 and 10.1.20.0/24.
So, you need to add a route to 10.1.10.0/24 like below.
Core-2(config)# ip route 10.1.10.0/24 10.1.12.1 vrf table1 To check if the route is properly stored in the routing table, you can use the command show ip route.
Administrative Distances
Sometimes, routers learn routes through different methods. A router might be running BGP and OSPF and have entered several static routes. However, it might have learned about the 10.1.20.0/24 network through all three methods. Which of these three routing methods should the router trust most?
Just choose the one with the lowest Administrative Distances.
This is very similar to how we learn information.
We will be very close to our parents and trust their words very much.
At this point we can say that we have a very low Administrative Distance from our parents.
If a stranger gives us advice that contradicts what our parents say, we'll listen to our parents rather than the stranger because the stranger has a higher administrative distance from us than our parents.
The table below shows the Administrative Distances for each routing protocol.
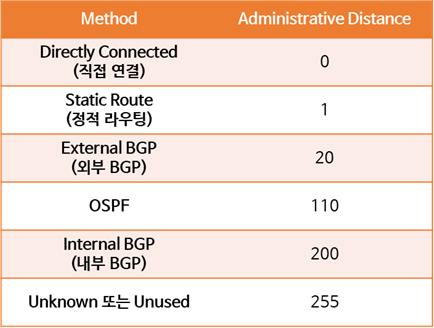
For example, if the Core-1 switch has learned about the 10.1.20.0 network through both OSPF and static routing, the switch will use the static routing route because it has the lowest Administrative Distances.
Floating Static Routes
You can also improve network resiliency by manipulating Administrative Distances to create primary and backup paths.
Let's say you have two Internet connections using different ISPs.
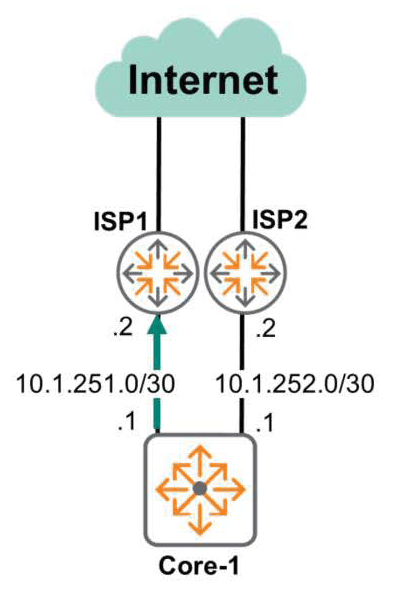
Because the first ISP Internet line has higher bandwidth than the second, network administrators will likely want to use the first line as the primary connection. The second line will serve as a backup line, ready to be used in case the first line fails.
To do this, you need to configure two static routes:.
One is to designate ISP-1 as the next-hop for all destinations 0.0.0.0. At this time, set the default Administrative Distances to 0.
Core-1(config)# ip route 0.0.0.0/0 10.1.251.1Another option is to specify ISP-2 as the next hop for all destinations 0.0.0.0. Here, change the default Administrative Distance to 10.
Core-1(config)# ip route 0.0.0.0/0 10.1.252.2 distance 10Since the ISP-1 route has a shorter administrative distance, this route is the only one used unless it is interrupted by a line failure.
However, if a problem occurs due to a line failure on ISP-1, the backup line, ISP-2, is used.
You can check this using the show ip route command.
Core-1# show ip route

0.0.0.0/0, vrf default via 10.1.251.2,[1/0],static 0.0.0.0/0, vrf default via 10.1.252.2,[10/0],static
※ reference: The 0.0.0.0 network is a network that summarizes all possible addresses in the IPv4 range.
That is, all addresses.
You must distinguish between the Default Gateway and the Default Route.
A default gateway represents an endpoint device, such as a host, or a device without routing capabilities, such as a Layer 2 switch. In these situations, it only provides information on where to send packets outside the same subnet.
The default route, defined as 0.0.0.0/0, is used by devices with routing processes enabled, such as routers and MultiLayer switches.
Scalability Issue
Static routing is simple and easy to use in small networks with few subnets.
However, if your company has hundreds or thousands of subnets, using static routing to manage them isn't an efficient way to do so. If routes aren't advertised automatically, you'll have to configure everything manually.
There will be no dynamic failover mechanism other than simple methods like Floating Static Routes.
The human factor will also be a big consideration.
If an administrator configures routing commands on the wrong device or fails to properly configure routes, serious problems can occur. This can lead to issues such as loops at Layer 3, traffic black-holing, and dropped connections.
If you use static routing, failure recovery of the routing device may be slow because new alternate routes must be manually configured.
Unlike static routing, dynamic routing protocols are much more scalable. They can handle thousands or even millions of routes across multiple routing devices. They also automatically assign alternate routes and provide failover with little or no downtime.
This keeps the network available and minimizes administrator workload as routers continuously exchange messages with each other.
So today we learned about the types of routing.
In particular, we looked at physically connected and manually set static routing.
And we've even looked at the differences between static routing and dynamic routing.
In the next post, we'll delve into dynamic routing in more detail.