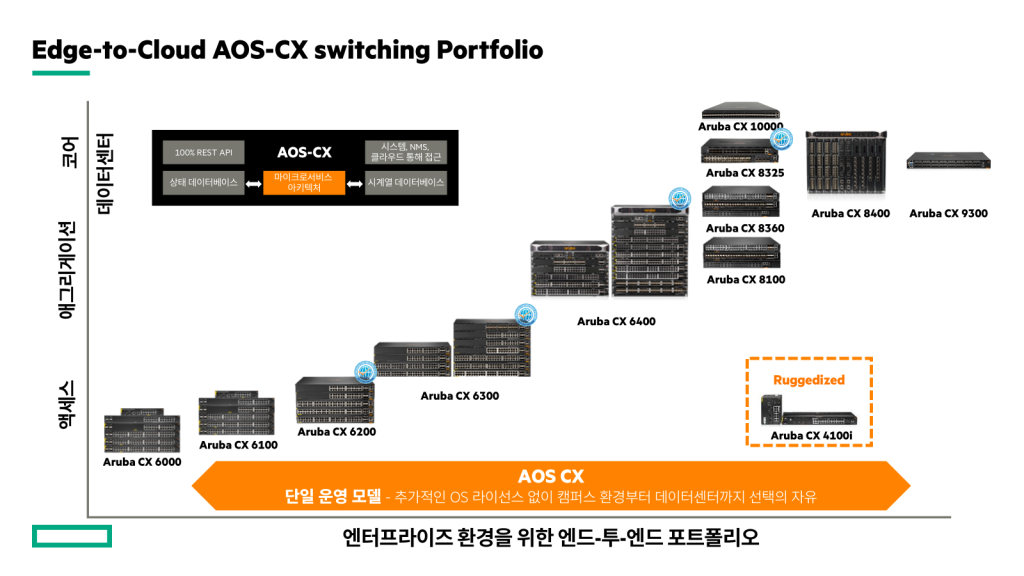
The wired mainstream of HPE Aruba Networking is the AOS-CX switch.
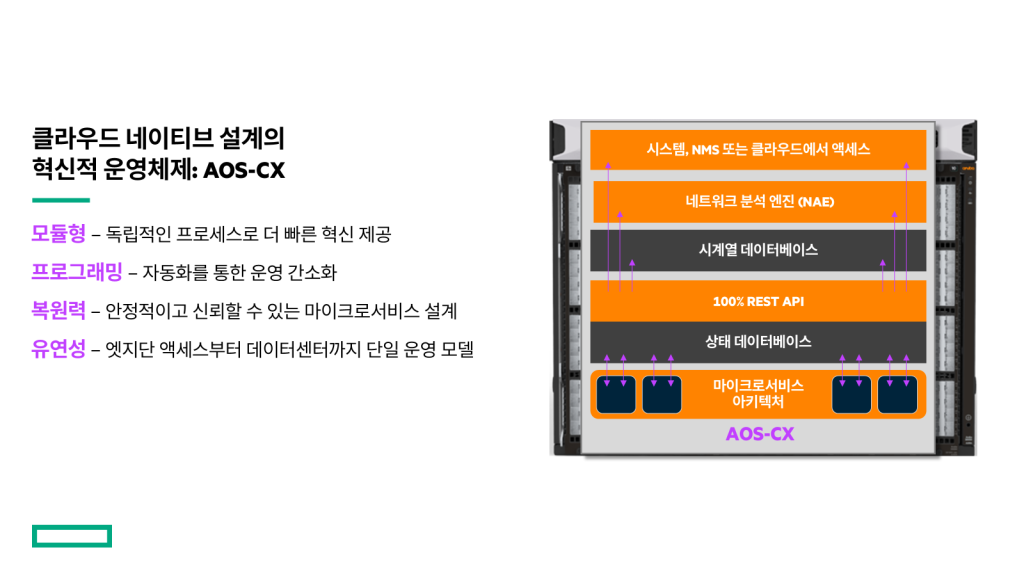
This product goes beyond traditional switching functions and aims for cloud nativeness through a microservice architecture.
Not only can you monitor and analyze various metrics and logs in real time through its own internal database, but it also supports 100% REST API for all switch functions, allowing you to remotely automate tasks for a large number of switches using Ansible or Python.
The basic command syntax is similar to Cisco equipment.
However, some commands may differ due to differences in software functionality, so please check the information below.
Connecting a Switch Console
AOS-CX switches have a console cable that can be used for initial configuration or as needed after deployment.
Depending on the AOS-CX product, the interface type of the console port may be RJ-45, USB-C, or both.
The terminal setup method is the same regardless of interface type.
- Connect the Switch console port and your laptop using a console cable.
- Run a terminal emulator (such as Putty) on your laptop and set it up as follows:.
- Speed: 115200 bps
- Data Bits: 8
- Stop Bits: 1
- Parity: None
- Flow Control: None
- When the terminal is connected, you will be prompted to log in using the default admin account.
When you press Enter, you will be prompted to set a password.
switch login: admin This account has no password hit enter to proceed: Password: To operate the switch securely, you must set a password to protect it. The password can be up to 32 characters long, including a combination of letters and numbers from ASCII 32 to 127, and various special characters such as *, &, !, -, _, and ?.
Please configure the 'admin' user account password. Enter new password: ******* Confirm new password: ******Once you have set your password, you will be logged in with the administrator context, indicated as #.
switch#Management (mgmt) interface setting
To manage the switch remotely, you must set the switch's IP address and enable remote access.
To separate the network from the actual data flow, it is recommended to configure a separate management network through the management interface.
By default, the management interface is set to automatically obtain an IP address from a DHCP server and SSH is enabled.
If your network does not have a DHCP server, you must configure a static address on the management interface.
First, log in to the switch Configurable context statesEnter into .
switch# configure
switch(config)#
interface mgmt Use the command to go to the management interface context.
switch(config)# interface mgmt
switch(config-if-mgmt)#
Currently applied to the management interface Check Config Informationdo.
If you have obtained an IP address through a DHCP server, the IP address will be displayed on the interface.
switch(config-if-mgmt)# show running-config current-context
     interface mgmt no shutdown ip dhcp switch(config-if-mgmt)#
If the DHCP server is not connected, manually enter the IP address, gateway, DNS server, etc. Enter informationdo.
switch(config)# interface mgmt
switch(config-if-mgmt)# ip static 198.168.100.10/24
switch(config-if-mgmt)# default-gateway 198.168.100.200
switch(config-if-mgmt)# nameserver 198.168.100.201
switch(config-if-mgmt)#
Config applied through Show command checkdo.
switch(config-if-mgmt)# show running-config current-context
     interface mgmt no shutdown ip static 198.168.100.10/24 default-gateway 198.168.100.200 nameserver 198.168.100.201 switch(config-if-mgmt)#
Apply the Config to the memory savedo.
switch(config-if-mgmt)# write memory
Copying configuration: [Success] Switch(config-if-mgmt)#
Commands applied to the management interface can also be checked using the following command.
switch# show interface mgmt
Address Mode : static Admin State : up Link State : up Mac Address : 50:00:00:05:00:00 IPv4 address/subnet-mask : 192.168.100.10/24 Default gateway IPv4 : IPv6 address/prefix : IPv6 link local address/prefix: fe80::5200:ff:fe05:0/64 Default gateway IPv6 : Primary Nameserver: 192.168.100.201 Secondary Nameserver: Tertiary Nameserver: switch(config-if-mgmt)#
switch# show run interface mgmt
interface mgmt no shutdown ip static 192.168.100.10/24 nameserver 192.168.100.201 switch#AOS-CX CLI context
The CLI context controls which parts of the switch can be managed and which commands can be used by users with appropriate permissions.
Each context role has different permissions available to it.
- Operator: You can check the configuration information (config) of the switch, but you cannot change it.
switch> - Manager: A command that does not require saving configuration changes. This is called “enable” mode, and is the default mode when an administrator logs in.
switch> enable
switch# diable
switch>- Global Configuration/admin: A command that changes the configuration of a switch. Commonly referred to as “config” mode.
switch# config
switch(config)# end
switch#
How to use CLI commands
AOS-CX commands support both abbreviations and autocompletion of commands.
This feature allows you to construct commands much more efficiently than typing the entire command.
Command Abbreviation
Enter only enough characters to match a valid command that the CLI will accept.
Example: In the Manager context conf Just type up to and press Enter.
Switches to configuration mode.
switch# conf
switch(config)#
Command Completion
After you type part of a command and press Tab, one of the following will appear:
- If you type enough characters to match a valid command, the CLI will display the rest of the word.
switch(config)# int     (hit the TAB key)
switch(config)# interface- If you do not enter enough characters to match a valid command, the CLI will not validate it as a command.
Pressing the Tab key again will display commands in the CLI that match the characters you typed.
switch(config)# cl     (hit the TAB key twice)
class clear clock switch(config)# cl- Type the required command, then double-tap after the completed word to display the command options in the CLI that you can then type.
switch(config)# clock     (hit the TAB key twice)
     date datetime time timezone switch(config)#
Change the administrator (admin) password
You may need to change the administrator password. You can do so using the command below.
switch(config)# user admin ?
     authorized-key Add SSH client's authorized-key. group Adding user to the group management-interface Configure the management interface through which the user is allowed to access the switch.
     password              Update user password
switch(config)# user admin password ? ciphertext update ciphertext password
Plaintext Update plaintext password. switch(config)# user admin password plaintext *****
confirm password:*****
switch(config)#Show command
Check switch config
To see the full command history of the current config: show running-config Use the command.
switch# show running-config
Current configuration: ! !Version ArubaOS-CX FL.10.13.0001AV !export-password: default hostname 6300-switch1 banner motd ! this text appears before being prompted for a password ! banner exec ! this text appears after a user has authenticated ! user admin group administrators password ciphertext AQBapczR2OzhRyRPu/LhfQ3T0uWUJTDQHWkP3R9VYo3g9UbJYwAAAPAuwjkx+ONM6lJL3eOZGWQS9Dje1CdsHQd278NHCL uqmil0gUf+2MnvWx9wuCMT2bGQIDiHCWzCe3dKa+Lge/A0BxyYzLJBKxrh8o+A5VFqDzTf2Da0v2g3/7j06RomlIOQIQ== clock timezone us/pacific checkpoint post-configuration timeout 60 vrf EVPN rd 192.168.1.1:3 vrf EVPN1 vrf red ntp server 128.138.140.44 ntp server 128.138.141.172 ntp enable … … … (abbreviated)
If you want to check only a specific config, you can use the following command.
6300(config)# sh running-config ?
  aaa Authentication, Auth and Accounting all Show running config with default values app-recognition Show application recognition information bgp Current running BGP configuration client Show Client tracking details container Show container configuration erps Show ERPS related data evpn Current running EVPN configuration external-storage Show external storage config flow Show IPFIX flow configuration flow-tracking Show flow tracking information gbpr Group-Based-Policy information hash Show SHA-256 hash of the configuration interface Interface information … … Abbreviate
Filtering using pipes (|)
AOS-CX, like other switches, allows you to filter its output using the pipe (|) command.
include, exclude, count, begin, redirection Options are available.
- Filter only interfaces with interface status up
switch# sho ip interface | inc up
Interface loopback1 is up
 Admin state is up
Interface loopback2 is up
 Admin state is up
Interface loopback3 is up
 Admin state is up
Interface vlan1 is up
 Admin state is up
Interface vlan2 is up
 Admin state is up
Interface vlan10 is up
 Admin state is up
Interface vlan100 is up
 Admin state is up
switch#- Excluding the loopback interface from the IP routing table
switch# sho ip route | exclude loopback
Displaying ipv4 routes selected for forwarding VRF: default Prefix Nexthop Interface VRF(egress)Origin/ Distance/Age ---------------------------------------------------------------------------------- 0.0.0.0/0 10.10.1.250 vlan1 - S [1/0] 02m:00w: 10.10.1.0/24 - vlan1 - C [0/0] - 10.10.1.100/32 - vlan1 - L [0/0] - 10.10.2.0/24 - vlan2 - C [0/0] - 10.10.2.100/32 - vlan2 - L [0/0] - Total Route Count: 6
Check commands in the interface
? If you use the command show interfaceYou can see a list of all available commands.
switch(config-if)# show interface ?
  IFNAME Interface name (eg 1/1/1) IFNAME.ID A subinterface name with identifier in the range 1 to 4094 IFRANGE PORT identifier range brief Show information in brief format dom Show transceiver diagnostics information downshift-enable Show downshift-enable information energy-efficient-ethernet Show Energy-Efficient Ethernet information environment Show interface environmental information error-statistics Show interface error statistics extended Show additional interface statistics fault-monitor Show fault monitor information flow-control Show flow control information human-readable Show statistic in human readable format lag Show LAG interface information link-status Show link status information loopback Show loopback interface information mgmt Management interface details persona Show interface persona information physical Show physical interface information qos Show QoS info for all interfaces queues Show transmit queue information for all interfaces statistics Show interface statistics transceiver Show transceiver information trunk View VLAN configuration for trunk interfaces tunnel Show tunnel interface information utilization Show utilization statistics vlan Show VLAN interface information vxlan Show VXLAN interface information
brief The command allows you to summarize information from the entire interface.
switch(config)# show interface brief
---------------------------------------------------------------------------------------- Port Native Mode Type Enabled Status Reason Speed Description VLAN (Mb/s) ---------------------------------------------------------------------------------------- 1/1/1 -- routed 1GbT yes up 1000 -- 1/1/2 -- routed 1GbT yes up 1000 -- 1/1/3 1 access 1GbT yes down Waiting for link -- -- 1/1/4 1 access 1GbT yes down Waiting for link -- -- 1/1/5 1 access 1GbT yes down Waiting for link -- -- 1/1/6 1 access 1GbT yes down Waiting for link -- -- 1/1/7 1 access 1GbT yes down Waiting for link -- -- 1/1/8 1 access 1GbT yes down Waiting for link -- -- 1/1/9 1 access 1GbT yes down Waiting for link -- -- … … loopback0 -- routed -- yes up -- Switch Control Pl... loopback1 -- routed -- yes up -- VTEP Source Loopback vlan1 -- -- -- yes up -- -- vlan2 -- -- -- yes up -- Simulator Lab Upli... vlan20 -- -- -- yes up -- -- vlan40 -- -- -- yes down -- -- vxlan1 -- -- -- yes up -- -- lag1 1 trunk -- yes up -- 1000 -- lag10 1 access -- no down -- auto -- lag20 -- routed -- yes up -- 2000 --
If you only want to see information about a specific interface, just type the interface at the end.
switch(config)# show int 1/1/1
Interface 1/1/1 is up Admin state is up Link state: up for 20 hours (since Thu May 02 02:04:55 UTC 2024) Link transitions: 31 Description: Persona: Hardware: Ethernet, MAC Address: 88:3a:30:96:5f:80 MTU 1500 Type 1GbT Full-duplex qos trust dscp Speed 1000 Mb/s Auto-negotiation is on Energy-Efficient Ethernet is disabled Flow-control: off Error-control: off MDI mode: MDI Rate collection interval: 300 seconds Rate RX TX Total (RX+TX) ---------------- -------------------- -------------------- -------------------- Mbits / sec 0.00 0.00 0.00 KPkts / sec 0.00 0.00 0.00 Unicast 0.00 0.00 0.00 Multicast 0.00 0.00 0.00 Broadcast 0.00 0.00 0.00 Utilization % 0.00 0.00 0.00 Statistic RX TX Total ---------------- -------------------- -------------------- -------------------- Packets 44814622 59237172 104051794 Unicast 32884758 54916384 87801142 Multicast 3252586 1565911 4818497 Broadcast 8677278 2754877 11432155 … More – next page:Space, next line:Enter, quit:q
Commands related to system status
AOS-CX is “show system” command to check visibility such as switch status.
switch# show system ?
  interface-group Show interface group information inventory Show installed hardware information resource-utilization Utilization of various system resources serviceos Display serviceOS information
The type of switch, serial number, and firmware information can all be checked with the command.
switch(config-if)# show system
Hostname : 6300-switch System Description : FL.10.13.0001AV System Contact : System Location : Vendor : Aruba Product Name : JL660A 6300M 24SR5 CL6 PoE 4SFP56 Sw Chassis Serial Nbr : SG9BKMZ05C Base MAC Address : 883a30-aae100 ArubaOS-CX Version : FL.10.13.0001AV Time Zone : US/Pacific Up Time : 8 weeks, 6 days, 1 hour, 9 minutes CPU Util (%) : 6 CPU Util (% avg 1 min) : 15 CPU Util (% avg 5 min) : 13 Memory Usage (%) : 21
inventory Using the command, you can check information about other modules such as power supply units (PSU), fans (FAN), and line cards.
switch# show system inventory
Type Location Product Description Serial Hardware Number Number Version -------------------- -------- ---------------- -------------------------------------------------- --------------- Chassis 1 JL661A 6300M 48-port 1GbE Class 4 PoE and 4-port SFP56... SG90KN009Q 3 Power Supply 1/1 JL670A Aruba X372 54VDC 1600W PS CN9AKN8128 01 Fan Tray 1/1 JL669A X751 FB Fan Tray CN99KN91P3 1 No matching interfaces
capacities The command shows the capacity of the features or services provided by the switch.
switch# show capacities ?
  active-gateway-extended-vmacs Filter Active Gateways extended router macs entreies. active-gateway-vmacs Filter Active Gateways vmacs entries. bfd Filter BFD entries. bgp Filter BGP entries. classifier Filter Classifier entries. client-insight-client-limit Filter Client-Insight client limit entries. client-track-ip-client-limit Filter maximum clients for tracking the IP address entries. containers Filter CONTAINERS entries. … …
For example, you can check the capacity of OSPFv2 or LAG (Link Aggregation Group).
switch# show capacities ospfv2

System Capacities: Filter OSPFv2 Capacities Name Value ----------------------------------------------------------------------- Maximum number of OSPFv2 areas configurable in the system 128 Maximum number of OSPFv2 interfaces configurable in the system 128 Maximum number of OSPFv2 interfaces per area in the system 128 Maximum number of OSPFv2 neighbors allowed across all VRFs 128 Maximum number of OSPFv2 processes supported across each VRF 8 Maximum number of routes in OSPFv2 supported across all VRFs 128000
switch# show capacities lag
System Capacities: Filter LAG Capacities Name Value --------------------------------------------------------------- Maximum number of configurable LAG ports 64 Maximum number of members supported by a LAG port 8To check the resource usage of CPU and memory top Use the command.
switch# top cpu
top - 21:24:20 up 5 days, 23:20, 1 user, load average: 0.29, 0.43, 0.46 Tasks: 306 total, 1 running, 305 sleeping, 0 stopped, 0 zombie %Cpu(s): 4.3 us, 4.3 sy, 0.0 ni, 91.3 id, 0.0 wa, 0.0 hi, 0.0 si, 0.0 st MiB Mem: 7603.6 total, 1639.2 free, 1784.9 used, 4179.5 buff/cache MiB Swap: 2048.0 total, 2048.0 free, 0.0 used. 5633.9 avail Mem PID USER PR NI VIRT RES SHR S %CPU %MEM TIME+ COMMAND 2436717 admin 20 0 3548 2260 1664 R 25.0 0.0 0:00.05 /usr/bin/top -b -n 2 -c -o %CPU -w 11+ 1093 root 20 0 2547800 236204 123528 S 8.3 3.0 483:34.85 /usr/bin/switchd_agent -i 1 -s 1 -p 1+ 3194 root 20 0 133960 23876 17788 S 8.3 0.3 31:26.93 /usr/bin/hpe-mgmdd --detach --pidfile+ 1 root 20 0 161784 11404 6112 S 0.0 0.1 2:35.00 /sbin/init 2 root 20 0 0 0 0 S 0.0 0.0 0:00.25 [kthreadd]
switch# top memory
top - 21:25:15 up 5 days, 23:21, 1 user, load average: 0.48, 0.45, 0.46 Tasks: 305 total, 3 running, 302 sleeping, 0 stopped, 0 zombie %Cpu(s): 28.6 us, 4.1 sy, 0.0 ni, 67.3 id, 0.0 wa, 0.0 hi, 0.0 si, 0.0 st MiB Mem: 7603.6 total, 1637.9 free, 1786.0 used, 4179.7 buff/cache MiB Swap: 2048.0 total, 2048.0 free, 0.0 used. 5632.6 avail Mem PID USER PR NI VIRT RES SHR S %CPU %MEM TIME+ COMMAND 1093 root 20 0 2547800 236204 123528 S 8.3 3.0 483:37.95 /usr/bin/switchd_agent -i 1 -s 1 -p 1+ 958 root 20 0 1660828 170824 26136 S 0.0 2.2 19:02.88 /usr/bin/hpe-restd 2987 root 20 0 1493804 131632 20440 S 0.0 1.7 17:26.64 /usr/bin/yang-resolverd -ip-address l+ 2855 root 20 0 164752 103252 27440 S 0.0 1.3 0:38.09 /usr/bin/arcd-dpi-engine --pidfile -v+ 4327 root 20 0 270884 100548 46240 S 0.0 1.3 91:27.55 /usr/bin/hpe-routing --detach --pidfi+
Finally, the OS image of the switch can be checked with the “show image” command.
You can check the currently operating OS firmware version, image information such as hash values, and backup image information.
switch# # show images
--------------------------------------------------------------------------- ArubaOS-CX Primary Image --------------------------------------------------------------------------- Version : FL.10.10.1010 Size : 920 MB Date : 2022-09-21 17:34:10 UTC SHA-256 : 5bf4bdc799e5f879209f249fb86b1cc0518a446178dae6c646a116ff1c814035 --------------------------------------------------------------------------- ArubaOS-CX Secondary Image --------------------------------------------------------------------------- Version : FL.10.13.0001AV Size : 983 MB Date : 2023-09-19 12:11:31 UTC SHA-256: df4f8fc3ef7758c30edd0141d0830fdc1563e443530c29d7768f769611be6e51 Default Image : secondary Boot Profile Timeout : 5 seconds --------------------------------------- Management Module 1/1 (Active) --------------------------------------- Active Image : secondary Service OS Version : FL.01.14.0002 BIOS Version :FL.01.0002
In this post, we learned how to easily connect to the CLI terminal, the basic command system, and the show command.
Next, we will learn about commands to configure actual switches, such as VLANs and OSPF.