In the last post, we looked at physical security and management plane security for the AOS-CX switch.
This time, we will cover security for the Control Plane area of the AOS-CX switch.
The contents of the previous post and this post are HPE homepageBased on the official information provided in .
Go to the AOS-CX 10.15 Hardening Guide (All Switch Series)
Control Plane Security
Control Plane Policing (CoPP)
CoPP prevents certain types of packets from flooding the switch or module CPU by rate-limiting or dropping them. The switch software provides several configurable packet classes that can be rate-limited, including (but not limited to) ARP broadcasts, multicasts, routing protocols (BGP, OSPF), and Spanning Tree.
CoPP is always enabled and cannot be disabled.
The default CoPP policy can be modified, but not deleted.
Administrators can create up to 32 custom CoPP policies, but only one can be active at a time.
To simply create and apply a custom CoPP policy, enter the following command:.
switch(config)# copp-policy copp_policy_01
switch(config-copp)# class arp-broadcast priority 2 rate 1000 burst 1000
switch(config-copp)# class unknown-multicast priority 2 rate 1000 burst 1000
switch(config-copp)# class unresolved-ip-unicast priority 2 rate 1000 burst 1000
switch(config-copp)# default-class priority 1 rate 3000 burst 3000
switch(config-copp)# exit
switch(config)# apply copp-policy copp_policy_01
If you want to revert to the default CoPP settings (factory-default), use the command below.
switch(config)# copp-policy default revertBelow is the default CoPP policy for the CX 6300 switch. It limits traffic classes and rates in packets-per-second (pps).
switch# show copp-policy default
class drop priority rate pps burst pkts hardware rate pps ------ ---- -------- -------- ---------- ----------------- acl-logging 0 25 25 25 arp-broadcast 2 1250 1250 1250 arp-protect 2 2075 2075 2075 arp-unicast 3 825 825 825 bfd-control 5 850 850 850 bgp 5 750 750 750 captive-portal 2 2075 259 2075 client-onboard 5 1024 1024 1000 dfp-collector 0 512 512 500 dhcp 2 750 750 750 erps 6 225 225 225 fib-optimization 0 100 200 100 icmp-broadcast-ipv4 2 325 325 325 icmp-multicast-ipv6 2 475 475 475 icmp-security-ipv6 2 325 325 325 icmp-unicast-ipv4 3 225 225 225 icmp-unicast-ipv6 3 400 400 400 ieee-8021x 2 2075 259 2075 igmp 4 1600 450 1600 ip-exceptions 0 100 100 100 ip-lockdown 0 100 100 100 ip-tracker 0 256 256 250 ipfix 0 2500 2500 2500 ipsec 5 1025 128 1025 ipv4-options 1 100 100 100 lacp 5 2050 2050 2050 lldp 5 100 100 100 loop-protect 6 225 225 225 mac-lockout 0 100 100 100 manageability 4 4218 4218 4200 mdns 2 150 150 150 mirror-to-cpu 0 100 100 100 mld 4 1600 450 1600 mvrp 5 225 225 225 nae-packet-monitor 0 100 200 0 ntp 4 100 100 100 ospf-multicast 5 1025 1025 1025 ospf-unicast 5 1025 1025 1025 pim 5 1700 1700 1700 ptp 5 1000 250 1000 secure-learn 2 2075 259 2075 sflow 1 1000 125 1000 stp 6 2000 2000 2000 udld 6 450 450 450 unknown-multicast 1 1025 128 1025 unresolved-ip-unicast 1 325 325 325 vrrp 4 400 400 400 default 2 4225 528 4225
Spanning Tree Security
Next, I'll explain the Spinning Tree security hardening workflow. It can be divided into two areas.
BPDU protect
AOS-CX switches feature various security mechanisms to protect the actual configuration from interference, malicious devices, or tampering with the network. BPDU protection protects the active topology by preventing spoofed BPDU packets from entering the network.
Typically, BPDU protection is applied to edge ports connected to end-user devices that are not running STP.
When an STP BPDU packet is received on a protected port, BPDU guard disables the port and sends a notification.

Therefore, it is recommended to enable BPDU Guard on end-user/device terminal connection ports to prevent unintentional Spannig Tree or malicious attacks.
switch(config)# interface 1/1/8
switch(config-if)# spanning-tree bpdu-guard
switch(config-if)# exit
Root Protection
Root Protection protects the active topology by preventing other switches from declaring their ability to propagate better BPDUs, which typically include both better information about the root bridge and the path cost to the root bridge that would replace the current root bridge election.
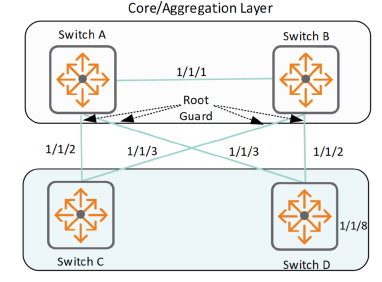
This is typically done between the core and access switches that are supposed to be the root, to prevent ports that are not expected to generate root information, such as server ports and access switch ports.
switch(config)# interface 1/1/8
switch(config-if)# spanning-tree root-guard
switch(config-if)# exit
You can check whether BPDU or Root Protection is applied by looking at the Spanning Tree related Config information.
switch# show spanning-tree interface 1/1/3
Port: 1/1/3 Admin State: up BPDU Guard: enabled
BPDU Filter : disabled RPVST Guard : disabled RPVST Filter : disabled Loop Guard : disabled Root Guard : enabled
TCN Guard : disabled Admin Edge Port : admin-network Link Type : Point to Point BPDU Tx Count : 31 BPDU Rx Count : 0 TCN Tx Count : 0 TCN Rx Count : 0
DHCP Security
DHCPv4/v6 Snooping
DHCP Snooping protects your network from DHCP attacks caused by rogue DHCP servers operating on your network, such as:.
- Address spoofing
- DHCP server address exhaustion due to attacker's mass address requests on the network
DHCP snooping specifies trusted DHCP servers and ports that accept DHCP requests and responses.

You can also use external storage to back up IP bindings to a file so they persist after a switch restart.
switch(config)# dhcpv4-snooping
switch(config)# dhcpv6-snooping
switch(config)# vlan 100
switch(config-vlan-100)# dhcpv4-snooping
switch(config-vlan-100)# dhcpv6-snooping
switch(config-vlan-100)# exit
switch(config)# switch(config)# interface 1/1/1
switch(config-if)# dhcpv4-snooping trust
switch(config-if)# dhcpv6-snooping trust
switch(config-if)# exit
switch(config)# dhcpv4-snooping authorized-server 192.168.2.10 vrf default
switch(config)# dhcpv6-snooping authorized-server ABCD:5ACD::2000 vrf default
switch(config)# dhcpv4-snooping external-storage volume dhcp_snoop file dsnoop_ipbindings
DHCPv6 Guard
DHCPv6 Guard is an extension of DHCPv6 Snooping.
When DHCPv6 snooping is configured globally and on a VLAN, ports are configured as trusted and untrusted ports.
DHCPv6 Guard enhances this functionality by creating policies and applying them to ports and VLANs.
This policy contains several attributes that are compared to packets received on trusted ports.
If the packet conforms to the policy's attributes, it is forwarded to the destination port; otherwise, the packet is dropped.
switch(config)# dhcpv6-snooping guard-policy pol1
switch(config-dhcpv6-guard-policy)# match server access-list acl1
switch(config-dhcpv6-guard-policy)# preference min 6
switch(config-dhcpv6-guard-policy)# preference max 250
switch(config-dhcpv6-guard-policy)# match client prefix-list pref1
switch(config-dhcpv6-guard-policy)# exit
switch(config)# vlan 5
switch(config-vlan-100)# dhcpv6-snooping guard-policy pol1
ARP Inspection
A feature that provides additional security to ARP.
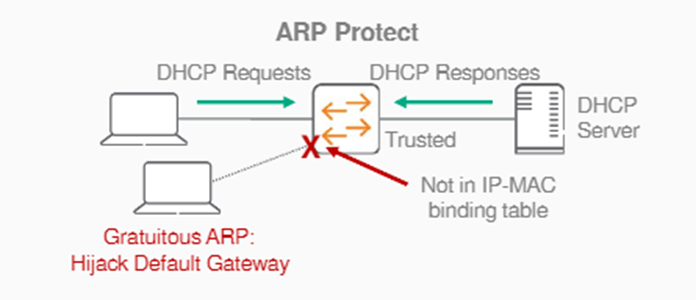
ARP does not support any inherent security mechanisms and relies on simple datagram exchanges, many of which are broadcast, for resolution. Because ARP is an unreliable and insecure protocol, it is vulnerable to attack.
To protect against attacks, you can set up the following defense mechanisms on your switch:.
- Enable dynamic ARP inspection at the VLAN level
- Define member ports of a VLAN as trusted or untrusted ports
(Only ARP traffic on untrusted ports is inspected. Routed ports are always trusted.) - Enforced using DHCP snooping binding and static IP binding
switch(config)# vlan 1
switch(config-vlan)# arp inspection
switch(config)# interface 1/1/1
switch(config-if)# arp inspection trust
IP Source Lockdown
Enhances security by preventing IPv4/v6 source address spoofing on a per-port basis.
To do this, we inspect every packet in hardware.
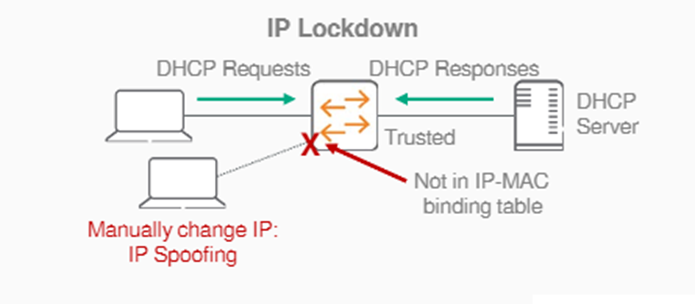
When IP Source Lockdown is enabled, IP traffic received on an interface (port) is forwarded only if the VLAN, IP address, MAC address, and interface (port) match an IP binding database entry.
IP Source Lockdown requires a populated IP binding database.
The binding database is dynamically populated through DHCP snooping, which learns and stores binding information.
Alternatively, you can statically populate the IP binding database using the IP source-binding command.
Enforced using DHCPv4/v6 snooping, ND snooping binding, and static IPv4/v6 binding.
switch(config)# interface 1/1/1
switch(config-if)# ipv4 source-lockdown
switch(config-if)# ipv6 source-lockdown
Blocking ND (Neighbor Discovery) attacks
ND Snooping
ND snooping is used in L2 switching networks to prevent ND attacks.
ND snooping drops invalid ND packets and, in conjunction with DIPLDv6 (Dynamic IP Lockdown for IPv6), blocks data traffic from invalid hosts. ND snooping learns the source MAC address, source IPv6 address, input interface, and VLAN of incoming ND messages and data packets to establish IP binding entries.
ND snooping drops ND packets for the following reasons:.
- If the Ethernet source MAC address does not match the address in the ICMPv6 target link-layer address field of the ND packet.
- If the global IPv6 address in the source address field does not match the ND snooping Prefix filter table.
- If the global IPv6 address or link-local IPv6 address in the source IP address field does not match the ND snooping binding table.
Below is an example VLAN configuration with ND snooping enabled globally.
switch(config)# nd-snooping
switch(config)# vlan 100
switch(config-vlan-100)# nd-snooping
switch(config-vlan-100)# exit
switch(config)#
switch(config)# show nd-snooping
ND Snooping Information ======================= ND Snooping : Enabled ND Snooping Enabled VLANs : 100 Trusted Port Bindings Enabled VLANs : 100 ND Guard Enabled VLANs : 100 RA Guard Enabled VLANs : 100 RA Drop Enabled VLANs : MAC Address Check : Disabled PORT TRUST MAX-BINDINGS CURRENT-BINDINGS ------- ------ ------------- ----------------- 1/1/1 Yes 1/1/2 YesRA(Router Advertisement) Guard
RA Guard blocks unwanted and forged RA messages from L2 access devices.
Ingress routing advertisement (RA) and routing redirect (RR) packets from the specified VLAN are prohibited on untrusted ports.
Packets are forwarded only when received on trusted ports.
If RA Guard policy is enabled (ipv6 nd-snooping ra-guard policy), RA packets received on a trusted port are validated against a set of parameters configured in the policy and assigned to a port or VLAN.
RA Guard policy options are:.
- Hop Limit
- Managed Config Flag
- Other Config Flag
- Router Preference
- ACL
- Advertised Prefix List
Let's add Other Config Flag and ACL options to the RA Guard policy named MyRAV:.
switch(config)# ipv6 nd-snooping ra-guard policy MyRAV
switch(config-raguard-policy)# other-config-flag off
switch(config-raguard-policy)# match access-list SA
switch(config)# vlan 10
switch(config-vlan-10)# nd-snooping ra-guard attach-policy MyRAVIPv6 Destination Guard
Enabling IPv6 Destination Guard helps prevent ND cache exhaustion issues and minimize denial-of-service (DoS) attacks.
switch(config)# vlan 10
switch(config-vlan-10)# ipv6 destination-guard
When IPv6 Destination Guard is enabled, address resolution is performed only for destination addresses that are active on the link.
To use this feature, the binding table must be populated with the help of DHCPv6 snooping, ND snooping, or static IP binding.
Destination Guard enables destination address-based filtering of IPv6 traffic and blocks ND protocol checks for destination addresses not found in the binding table.
You can check the statistics of the configured IPv6 Destination Guard using the show command.
switch# show ipv6 destination-guard statistics
Packets dropped for VLAN 10 : 25467 Packets dropped for VLAN 30 : 434 Packets dropped for VLAN 50 : 8767
Routing Protocol Security – OSPF
OSPF Passive Interfaces
Unlike BGP, most routing protocols tend to discover neighbors through sending and receiving Hello packets. Because these neighbor relationships are dynamically established, administrators must control which neighbor relationships can be formed and ensure that potential neighbors are known and trusted.
To limit where OSPF can learn neighbors, AOS-CX supports passive OSPF interfaces.
A passive OSPF interface announces IP subnets but does not establish neighbor relationships with other OSPF devices on the interface.
All OSPF enabled interfaces must be manually configured. In the router context, enable passive interfaces,
switch(config)# router ospf 1
switch(config-ospf-1)# passive-interface default
It is recommended to disable OSPF neighbor relationships on interfaces where they are allowed.
switch(config)# interface 1/1/1
switch(config-if)# no ip ospf passive
Neighbor Authentication
All OSPF exchanges are authenticated.
However, the default authentication used by network manufacturers is “null”, meaning empty or 0.
AOS-CX supports multiple OSPFv2 authentication methods, including SHA cryptographic hashes up to 512 bits, to authenticate messages between OSPF neighbors. When configuring authentication between OSPF neighbors, the authentication method and authentication key must be identical on the interfaces connected to both devices.
To configure SHA-512 authentication, change the default authentication method from null to hmac-sha-512 in the interface context.
switch(config-if)# ip ospf authentication hmac-sha-512Alternatively, you can use the AOS-CX Keychain feature to specify an encryption authentication key that can be used on multiple OSPF interfaces.
switch(config)# keychain ospf-keychain
switch(config-keychain)# key 1
switch(config-keychain-key)# cryptographic-algorithm hmac-sha-512
switch(config-keychain-key)# key-string plaintext ospfshakeystring
switch(config-keychain-key)# interface 1/1/49
switch(config-if)# ip ospf authentication keychain
switch(config-if)# ip ospf keychain ospf-keychain
OSPFv3 Area Authentication and Encryption with IPsec
OSPFv3 Neighbor can use interface-level authentication.
Alternatively, you can provide encryption, authentication, or both for the entire OSPFv3 area using the IPsec protocol, which automatically applies the method configured on all member interfaces. AOS-CX supports two types of IPsec encapsulation to secure an OSPFv3 area:
- IPv6 Authentication Header (AH) adds an IPv6 authentication header to OSPFv3 packets.
- Encrypted Security Payload (ESP) provides both authentication and encryption for OSPFv3 packets.
IPsec authentication and encryption are configured in the context of the OSPFv3 router process.
Both authentication and encryption require a specified Security Policy Index (SPI), which is an integer value between 256 and 4,294,967,295, and is used to match the IPsec authentication and/or encryption policy configured on each OSPFv3 router in the security zone.
Each OSPFv3 IPsec policy on a switch must use a different SPI value, and the SPI value (authentication or encryption key, or both) must match on all OSPFv3 neighboring interfaces that use that policy within a security zone.
To configure AH authentication for OSPFv3 Area 1, specify the SPI, the authentication method (md5 or sha1), the key type (plaintext, string, or ciphertext), and the key string itself. If you do not specify the key type and string, the user will be prompted interactively to enter a plaintext key.
switch(config-ospfv3-1)# area 1 authentication ipsec spi 1024 sha1
Enter the IPsec authentication key: ******* Re-Enter the IPsec authentication key: ********
To configure ESP encryption for Area 1, specify the SPI, authentication method, authentication key type and string, encryption type (3des, aes, des, or null), key type, and encryption key string. If you do not specify the encryption type and key string, you will be prompted to enter the plaintext key interactively. If you do not specify the authentication key type and string, you will be prompted to enter both the plaintext authentication key and the desired encryption type and plaintext key.
switch(config-ospfv3-1)# area 1 encryption ipsec spi 1024 sha1
Enter the IPsec authentication key: ******* Re-Enter the IPsec authentication key: ******* Enter the IPsec encryption type (3des/aes/des/null)? aes Enter the IPsec encryption key: **************** Re-Enter the IPsec encryption key: ****************
Routing Protocol Security – BGP
The IETF Best Practice for BGP Security (BCP194) focuses on three things:
- Leverage the Control Plane ACL feature to restrict BGP communication to configured BGP peers.
- Securing BGP sessions between peers using authentication
- Prevents third-party spoofing attacks using TTL security mechanism
Control Plane ACL
The Control Plane handles the management and routing functions of the devices.
This allows you to control the list of devices that can establish BGP peering sessions with the switch.
Devices running BGP listen for connections on TCP port 179.
When establishing a BGP peer session, one device actively establishes a relationship with the other peer by sending the first TCP SYN packet.
This device is on the outgoing side of the connection. The other peer that receives the TCP SYN responds with a SYN or ACK on the incoming connection.
Since each peer can assume one of two roles, you must configure ACL entries for BGP in both directions.
The entry below allows traffic from 10.20.0.10 to establish a BGP peering session with the device.
Since either side can act as a sender or receiver on a connection, the ACL requires two entries per peer.
switch(config)# access-list ip CONTROLPLANE
switch(config-acl-ip)# 800 comments LOCKDOWN BGP SESSIONS
switch(config-acl-ip)# 805 permit tcp 10.20.0.10 gt 1023 any eq 179
switch(config-acl-ip)# 810 permit tcp 10.20.0.10 eq 179 any gt 1023
After allowing traffic from all configured peers, deny all other traffic to and from TCP port 179, preventing any other devices from establishing BGP peering sessions.
switch(config-acl-ip)# 890 deny tcp any gt 1023 any eq 179
switch(config-acl-ip)# 895 deny tcp any eq 179 any gt 1023
TCP session authentication
You can secure a TCP session between two peers by adding MD5 protection to the TCP session header.
The MD5 digest acts like a password between peers.
This configuration is done within the context of the BGP configuration, and both peers must configure the same password.
switch(config)# router bgp 1
switch(config-bgp)# neighbor 10.20.0.10 password plaintext meatballs4me!
TTL Security
Assuming that most routing neighbors are directly connected, a simple way to prevent remote spoofing by remote devices is to check the TTL of packets sent by the peer and drop packets with a TTL smaller than expected.
The following example uses the BGP peer specified above.
Assuming the maximum TTL value is 255, compare the packet sent from the peer with the hop count entered as 1 below.
switch(config)# router bgp 1
switch(config-bgp)# neighbor 10.20.0.10 ttl-security-hops 1
If the maximum TTL value is 255 and the configured hop count value is 1, packets with a TTL less than 254 will be dropped.
switch # show run bgpMulticast Security – SSDP (Simple Service Discovery Protocol)
SSDP is an application layer protocol and one of the core protocols implementing Universal Plug and Play (UPnP).
SSDP allows network devices to discover and advertise network services by sending multicast discovery and advertisement messages to the multicast IPv4 group address 239.255.255.250:1900 or the multicast IPv6 group address FF0x::C.
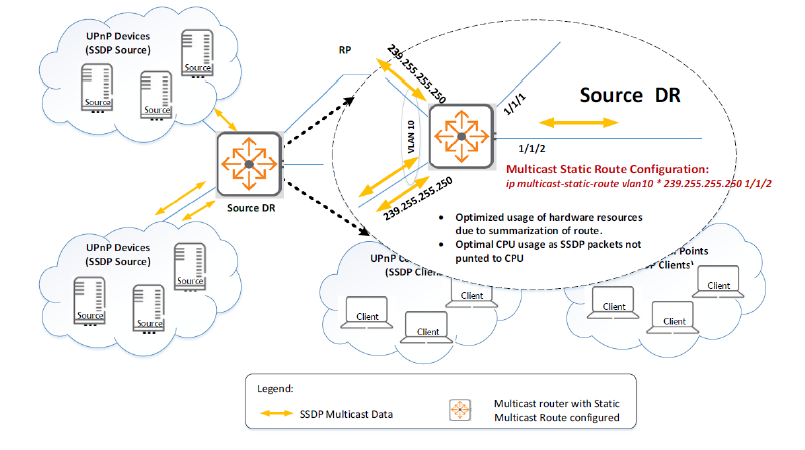
With UPnP, each device creates its own multicast flow (source IP, SSDP group IP).
In multicast networks with many end-user devices, each device creates its own (S, G) flow, and resources are limited, which can consume significant multicast hardware and software resources. In these networks, it is necessary to control, drop, or minimize SSDP traffic.
Recommendation –
- You can configure summarized static multicast routes to conserve network resources and prevent denial of service.
switch(config)# ip multicast-static-route vlan10 any 239.250.255.250 1/1/2- If SSDP service is not enabled on your network, we recommend disabling SSDP via VLAN ACL or policy.
switch(config)# access-list ip drop_ssdp
switch(config-acl-ip)# 10 deny udp any 239.255.255.250 eq 1900
switch(config)# vlan 10
switch(config-vlan-10)# apply access-list ip drop_ssdp in
switch(config)# interface 1/1/1
switch(config-if)# no shutdown
switch(config-if)# no routing
switch(config-if)# vlan access 10
switch(config)# interface vlan 10
switch(config-if-vlan)# IP address 192.168.1.2/24
switch(config-if-vlan)# ip igmp enable
switch(config-if-vlan)# ip pim-sparse enable
switch(config)# router pim
switch(config-pim)# enable
switch(config)# class ip drop_class
switch(config-class-ip)# 10 match any any 239.255.255.250
switch(config)# policy drop_ssdp
switch(config-policy)# 10 class ip drop_class action drop
switch(config)# vlan 10
switch(config-vlan-10)# apply policy drop_ssdp in
switch(config)# interface 1/1/1
switch(config-if)# no shutdown
switch(config-if)# no routing
switch(config-if)# vlan access 10
switch(config)# interface vlan 10
switch(config-if-vlan)# IP address 192.168.1.2/24
switch(config-if-vlan)# ip igmp enable
switch(config-if-vlan)# ip pim-sparse enable
switch(config)# router pim
switch(config-pim)# enableMulticast Security – IGMP & MLD Snooping
IGMP snooping is a multicast restriction mechanism implemented on L2 devices to improve multicast forwarding efficiency.
If IGMP snooping is not enabled, the snooping switch floods multicast packets to all hosts in the VLAN.
IGMP L2 snooping switches offer bandwidth savings on network segments where no nodes have expressed interest in receiving packets addressed to a group address. With IGMP snooping enabled, L2 snooping switches forward multicast packets from known multicast groups only to the recipients.
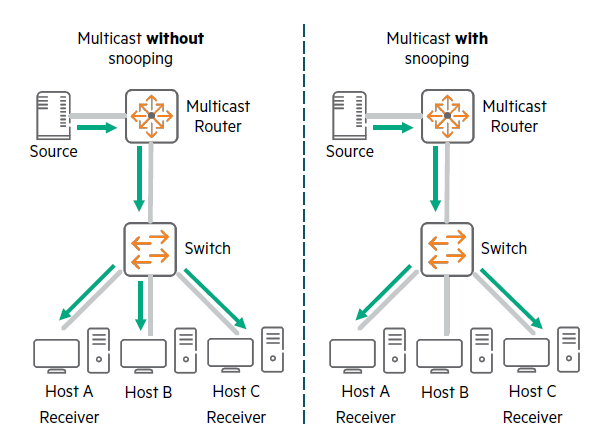
Multicast Receiver Discovery (MLD) snooping optimizes multicast traffic across the network, preventing it from flooding ports within a VLAN. For example, one of MLD snooping's features allows you to configure your network to forward traffic only to ports that initiate MLD requests for multicast.
switch(config)# vlan 10
switch(config-vlan-10)# ip igmp snooping enable
switch(config-vlan-10)# ip igmp snooping version 2
switch(config-vlan-10)# ipv6 mld snooping enable
switch(config-vlan-10)# exit
If there are a lot of invalid multicast entries generated based on IGMP or MLD reports from malicious users, the device cannot provide multicast services to legitimate users.
To control which multicast groups a host can join, configure a multicast group policy on an L2 device with IGMP snooping or MLD snooping enabled. When a host sends an IGMP or MLD report requesting a multicast program, the L2 device filters the report using the multicast group policy. The L2 device adds the host's port to the outgoing port list only if the report is permitted by the multicast group policy.
switch(config)# ip igmp snooping filter-unknown-mcast
switch(config)# ipv6 mld snooping filter-unknown-mcast
switch(config)# ip igmp snooping apply access list <ACL-NAME>
switch(config)# ipv6 mld snooping apply access list <ACL-NAME>
Multicast Security – Protocol Independent Multicast (PIM)
In networks where IP multicast traffic is transmitted for multimedia applications, this traffic is blocked at routed interface (VLAN) boundaries if a multicast routing protocol is not running. PIM is one of the routing protocols that forms a multicast tree and forwards traffic to subnets using protocols like IGMP to request traffic from multicast sources.
PIM Accept-Register
PIM Accept-Register is a security feature that allows you to control which sources and groups can register with a rendezvous point (RP).
When a Register ACL is attached to a PIM router, the PIM protocol stores the source and destination address details along with the action (allow or deny).
switch(config)# access-list ip pim_reg_acl
switch(config-acl-ip)# 10 permit any 20.1.1.1 225.1.1.2
switch(config-acl-ip)# 20 deny any 30.1.1.1 225.1.1.3
switch(config)# router pim
switch(config-pim)# accept-register access-list pim_reg_acl
switch(config)# access-list ipv6 pim_regv6_acl
switch(config-acl-ipv6)# 10 permit any 20.::1 ff1e::1
switch(config-acl-ipv6)# 20 deny any 30::1 ff1e::3
switch(config)# router pim6
switch(config-pim6)# accept-register access-list pim_regv6_aclPIM Accept-RP
PIM Accept-RP prevents unwanted rendezvous points (RPs) in a PIM Sparse Mode domain.
By default, the RP accepts all multicast groups in the 224.0.0.0/4 range (the entire Class D range), but you can configure the router to accept PIM Join/Prune messages only for the groups you want, if necessary.
switch(config)# access-list ip pim_rp_grp_acl
switch(config-acl-ip)# 10 permit any any 225.1.1.2/255.255.255.0
switch(config-acl-ip)# 20 permit any any 239.1.1.2/255.255.255.0
switch(config)-acl-ip# router pim
switch(config-pim)# accept-rp 30.1.1.1 access-list pim_rp_grp_acl
switch(config-pim)# access-list ip pim_rpv6_grp_acl
switch(config-acl-ipv6)# 10 permit any any ff2e::2/64
switch(config-acl-ipv6)# 20 permit any any ff1e::1/64
switch(config-acl-ipv6)# router pim6
switch(config-pim6)# accept-rp 30::1 access-list pim_rpv6_grp_aclPIM Source-Specific Multicast (SSM)
PIM-SSM uses PIM Sparse mode and a subset of IGMP version 3 (IGMPv3)/MLD version 2 (MLDv2) to allow multicast receivers to receive traffic from specified source addresses.
The default PIM SSM group ranges are IPv4 – 232.0.0.0/8 and IPv6 – FF3x::/32.
The scope access list allows you to modify the default SSM scope on the PIM router.
- In an ACL used to specify a PIM-SSM range, the ACE must contain only the multicast group address in the Destination IP field, otherwise the ACE is ignored.
- Modifying the PIM-SSM range may result in temporary traffic loss until PIM reconfigures its state.
- It is recommended to keep the SSM range the same across the network.
switch(config)# access-list ip pim_ssm_grp_range_acl
switch(config-acl-ip)# 10 permit any any 225.1.1.2/255.255.255.0
switch(config-acl-ip)# 20 permit any any 239.1.1.2/255.255.255.0
switch(config)# router pim
switch(config-pim)# pim-ssm range-access-list pim_ssm_grp_range_acl
switch(config)# access-list ipv6 pim_ssm_v6grp_range_acl
switch(config-acl-ipv6)# 10 permit any any ff2e::2/64
switch(config-acl-ipv6)# 20 permit any any ff1e::1/64
switch(config)# router pim6
switch(config-pim6)# pim-ssm range-access-list pim_ssm_v6grp_range_aclMulticast Source Discovery Protocol (MSDP) security
MSDP is a mechanism that connects multiple PIM-SM domains.
MSDP allows you to advertise a group's multicast source to all rendezvous points (RPs) in different domains.
RPs run MSDP over TCP to discover multicast sources in other domains. The primary advantage of MSDP is that it reduces the complexity of interconnecting multiple PIM-SM domains by allowing them to use an inter-domain source tree instead of a common shared tree.
To enhance MSDP security, you must establish a TCP connection with MD5 authentication enabled for both MSDP peers.
If MD5 authentication fails, the TCP connection cannot be established.
switch(config)# router msdp
switch(config-msdp)# ip msdp peer 10.1.1.1
switch(config-msdp-peer)# switch(config-msdp-peer)# password
Enter the MD5 password: ******** Re-Enter the MD5 password: ********
MSDP uses SA (Source Activation) messages containing S,G (Source Group) information for Rendezvous Points (RPs) in PIM Sparse domains.
By default, a router with MSDP enabled forwards all SA messages, and the peer router processes all received messages.
This command allows users to configure ACLs to filter SA messages from MSDP peers.
Users can block incoming and outgoing SA messages on the MSDP router by creating incoming and outgoing filter lists using ACLs.
switch(config-msdp-peer)# sa-filter in access-list msdp_sa_filter1
switch(config-msdp-peer)# sa-filter out access-list msdp_sa_filter2
Reliable Supply Chain
HPE is a leader in supply chain cybersecurity in the ICT (Information and Communications Technology) industry.
Supply chain attacks are on the rise, with malicious actors infiltrating systems through partners or technology suppliers with access to data and resources. As cybersecurity threats evolve, HPE continuously identifies and mitigates cybersecurity risks within the supply chain and provides secure products, enabling customers to focus on their business objectives.
The following is a switch security guide required for safe product delivery from the AOS-CX switch perspective.
- Enhanced Secure ModeBooting with a low-power switch
- Disable USB ports when not in use
- Disable all physical interfaces and OOBM ports using the following command:
switch(config)# interface switch(config)# disable switch(config)# exitswitch(config)# interface mgmt switch(config)# shutdown switch(config)# exit- Disable remote management protocols (https-server, SSH, SNMP) on all enabled VRFs using the following command:
– Configure the switch by accessing it only through the console
switch(config)# no ssh server vrf
switch(config)# no https-server vrf
switch(config)# no snmp-server vrf- Set password complexity with a strong combination
- Enable ServiceOS password prompt
- Disable the Central client using the following command:
switch(config)# aruba-central
switch(config-aruba-central)# disable
switch(config-aruba-central)# exit- Enables the use of only NDcPP-approved SSH algorithms
In these two posts, we looked at some commands to harden the security of AOS-CX switches.
As network attacks become more sophisticated and sophisticated, security settings for switches are becoming more important.
Many attacks and breaches can be prevented with just a few simple settings, so it's a good idea to refer to them when initially setting up your switch.