Our networks are constantly growing. We expand existing networks, separate them for specific purposes, or create new networks for new businesses.
As networks grow, maintenance becomes increasingly difficult for administrators. In particular, large-scale network changes require prior preparation, design, configuration, and verification of each and every network device. While the Command Line Interface (CLI) is a powerful tool for configuration, it lacks scalability.
Introducing Aruba NetEdit
Aruba NetEdit provides configuration, monitoring, and troubleshooting of each connected switch.
Provides workflow automation that enables changes to multiple devices without the need for separate programming skills, while remaining consistent and compliant.
This allows administrators to have a smart and error-free configuration environment.
IT departments can now orchestrate end-to-end service rollouts, rapidly automate changes across the network, and ensure policy compliance after network updates.
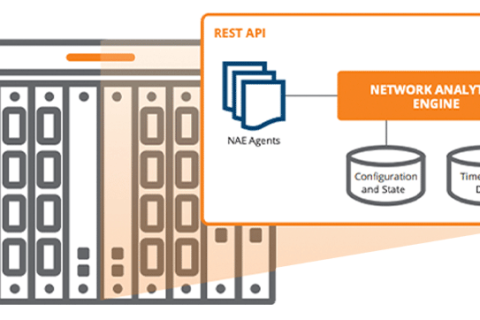
Aruba NetEdit works closely with the Network Analytics Engine (NAE), the analytics capability built into ArubaCX switches.
NetEdit provides compliance, design verification, analysis, and troubleshooting, empowering network administrators and operators with intelligent business support and continuous validation.
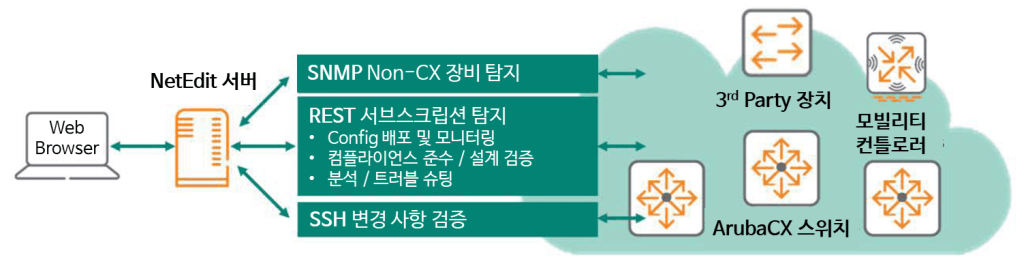
As shown in the figure, NetEdit communicates with ArubaOS-CX switches via the Representational State Transfer Application Programming Interface (REST API).
I previously explained that ArubaOS-CX supports the 100% REST API as a feature, right?
This means that all configuration, monitoring, and verification of ArubaCX switches can be done using only REST APIs.
Additionally, it uses SSH to verify changes and supports SNMPv2c and SNMPv3 for discovery of non-CX devices.
Installing NetEdit
Aruba NetEdit is a web-based application that runs as a virtual machine in an Open Virtualization Application (OVA).
NetEdit, which can be installed on VMware's vSphere 6.0 or later, requires the following specifications:.
- 6 virtual CPUs
- 32GB RAM
- 115GB disk space
- Networks that can be connected to the switches to be managed

Installation is as simple as selecting “Deploy OVF Template” in the vSphere Web Client and following the wizard to deploy the NetEdit ova file.
NetEdit initial configuration
Once you have installed NetEdit's VM, you will need to do some setup to use it.
1. Initial login with the “neadmin” account on the console screen.
netedit-server login: neadmin2. Set the initial password.
Debian GNU/Linux 9 netedit-server tty1 netedit-server login: neadmin You are required to change your password immediately (root enforced)
New password:
Retype new password:
3. After completing the password setup, log in with the new password. Console-based configuration will then begin automatically.
4. A page will appear with instructions for configuring the system. (You can return to the initial configuration menu using the Python command.)
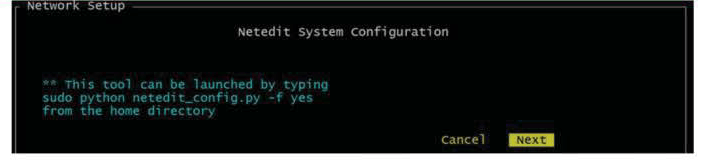
5. Review the license terms and select “Agree.”.
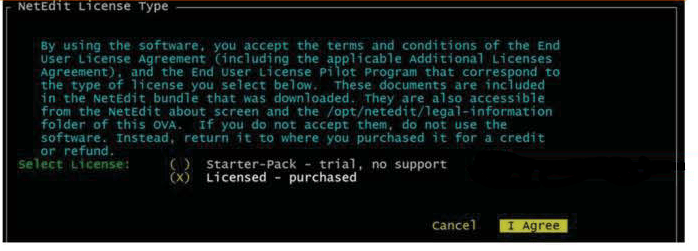
※ NetEdit is Free for up to 25 switches(Use as trial version)
To manage more devices, you will need to subscribe to a 1-year or 3-year subscription.
6. Set the Hostname and IP for network configuration.
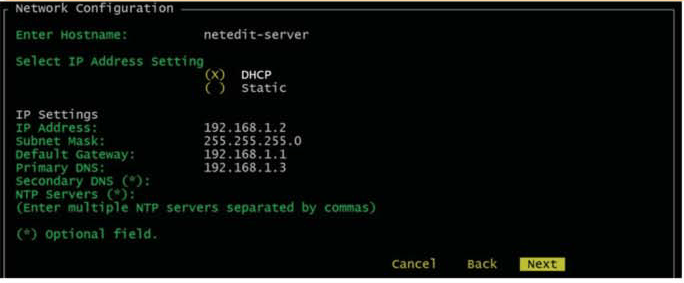
7. Check all settings and click “OK”.
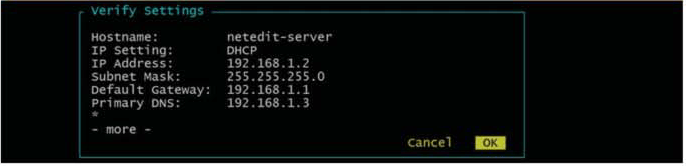
Configuring the NetEdit GUI
1. Access the NetEdit web page by entering the IP address of the NetEdit server in your web browser.
- https://
2. On the first login page, log in using the account information below.
- Username: admin
- Password: [blank]
The password set above is for console access and is different from the password for web login.
3. Upon successful first login, a screen will appear asking you to change the default password.
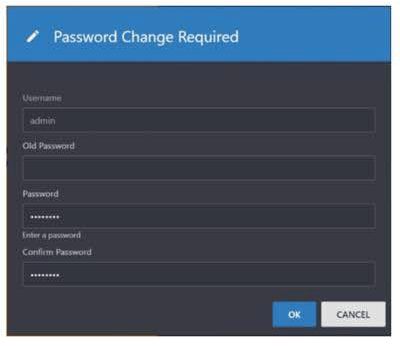
- Old Password: [space]
- Password: [New Password]
- Confirm Password: [New Password]
4. Once the password change is complete, the Overview screen below will appear, and NetEdit is ready to use.
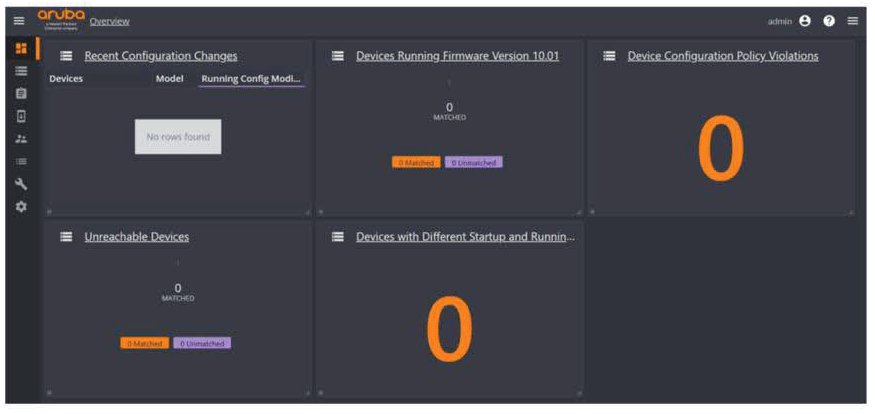
Device Discovery with NetEdit
To discover devices with Aruba NetEdit, each switch requires the following:.
- The Admin user must have a password set.
- The switch must be connected via the OOBM port.
- SSH must be enabled on the mgmt VRF.
- HTTPS must be enabled on the mgmt VRF.
- The REST interface must have read-write mode enabled.
To meet these prerequisites, the following configuration must be done in advance for each switch:.
Switch(config)# user admin password
Switch(config)# interface mgmt
Switch(config-if-mgmt)# no shutdown
Switch(config-if-mgmt)# ip static <ip-address>
Switch(config-if-mgmt)# default-gateway <default-gateway-IP>
Switch(config)# ssh server vrf mgmt
Switch(config)# https-server vrf mgmt
Switch(config)# https-server rest access-mode read-write
Once this pre-configuration is complete, Aruba NetEdit will automatically discover the ArubaOS-CX switch.
This process allows NetEdit to monitor and manage the device.
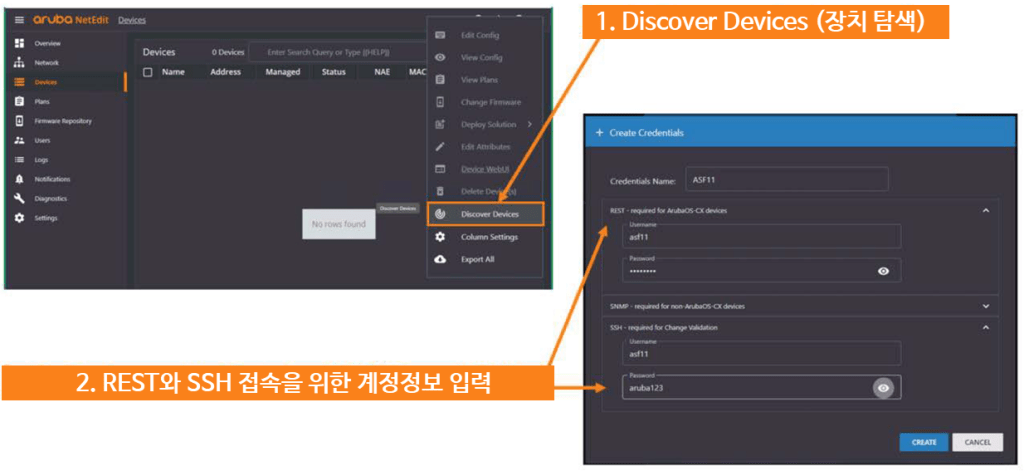
Step 1. [Action] Go to the menu [Discover Devices] is selected.
Step 2. Enter the account information for the admin account configured on the ArubaOS-CX switch. (Create a template for account information)
※ reference: NetEdit also allows you to add devices manually.
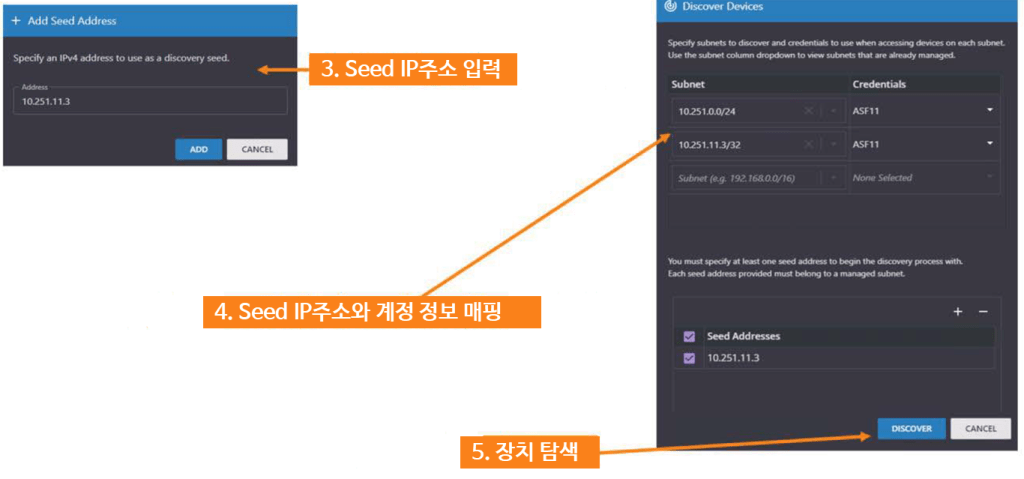
Step 3. Enter the Seed IP address.
Step 4. Map the seed IP address to the account information created above.
Step 5. Search for your device.
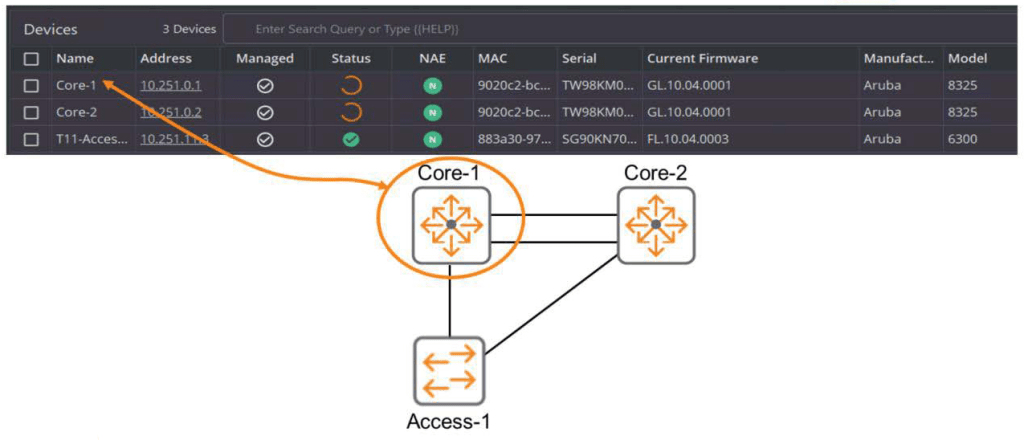
Once the device search is complete, information will be automatically retrieved as shown in the image above.
Monitoring devices with NetEdit
NetEdit is not a Network Management System (NMS), but it can check basic switch status information.
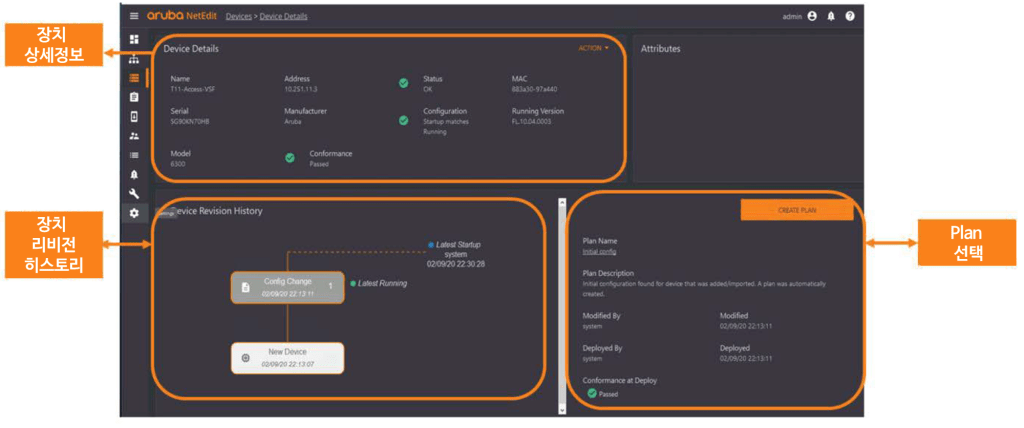
The Device Details screen shows basic information such as hostname, serial information, and MAC address.
And in the Revision History section at the bottom, you can see the history of configuration changes applied to the device.
Additionally, there is a screen where you can create and select a plan to configure on your device.
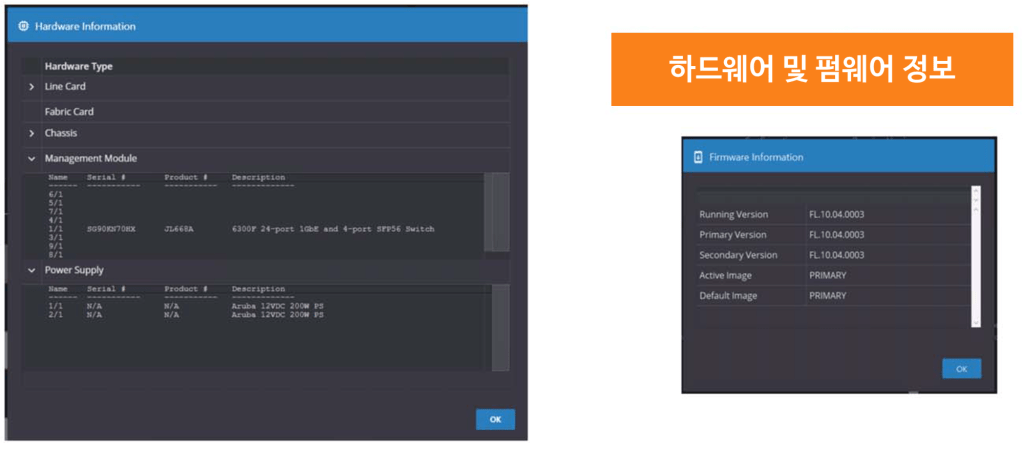
NetEdit also allows you to view information about installed hardware. For example, you can view information about transceivers, line cards, and power supply units (PSUs) installed on a CX-OS switch.
You can also check the firmware information located in the Primary Secondary partition.
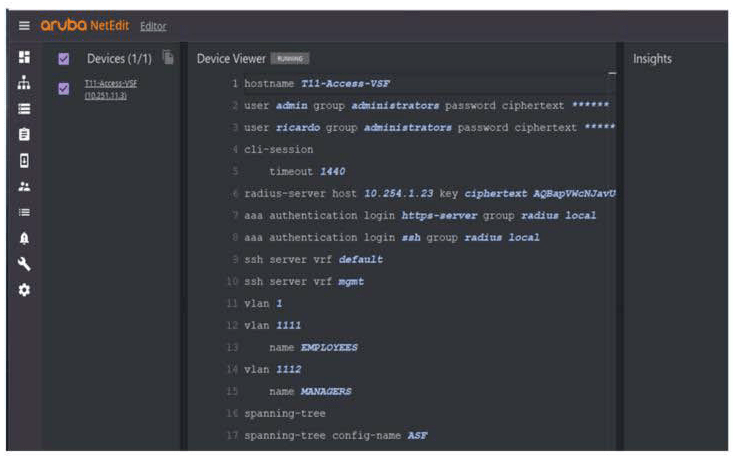
Additionally, you can check the configuration information (config information) configured for each switch in NetEdit without a separate command.
Managing devices with NetEdit
Every time an administrator configures something on a device, they must create a Configuration Plan.
For example, if you want to configure VLAN 1112 on interface 2/1/4, proceed as follows:.
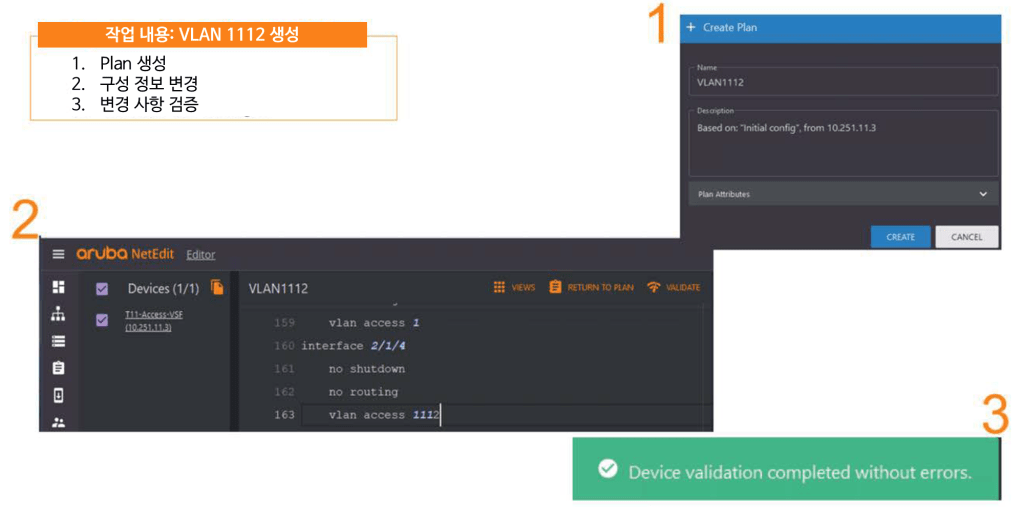
Step 1. Create a Plan
Step 2. Enter configuration. (Provides the same user experience as configuring ports in the CLI.)
Step 3. Verify changes. Ensure there are no errors before moving on to the next step.
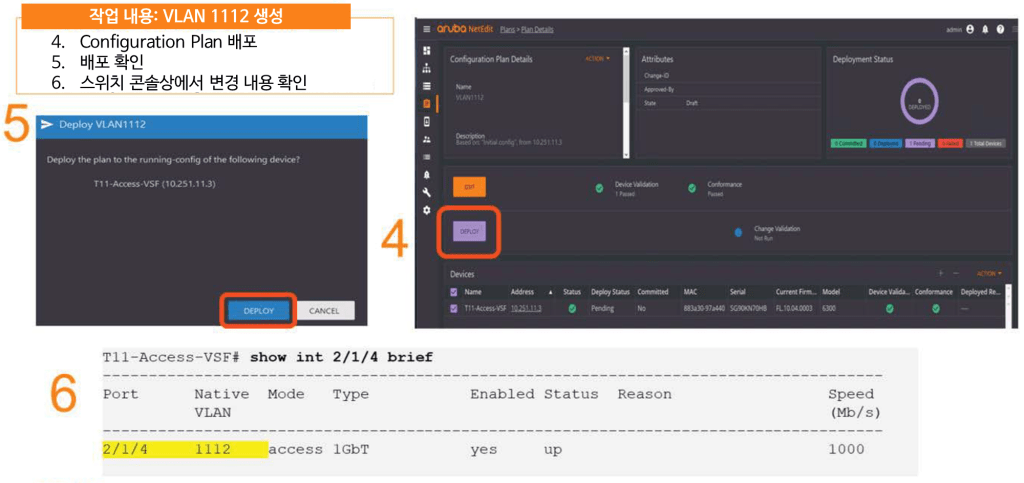
Step 4. Deploy the created Plan.
Step 5. Double-check the Plan deployment and click “Deploy”.
Step 6. Verify that the changes have been applied successfully on the switch's CLI screen.
Additionally, Aruba NetEdit can compare the configuration before and after the switch to show you what is different.
It also provides audit information about who changed the config and when.
I can create a template by configuring the basic configuration I need, and then use that template whenever I install a new switch. It also significantly reduces human error by checking for typos and configuration errors while I'm writing the configuration.
For various purposes and security reasons within companies, networks are being segmented and the number of network devices is increasing accordingly.
Managing numerous network devices can be challenging, increasing the likelihood of errors and failures. In such situations, utilizing NetEdit, a tool that allows for batch management of network devices, will enable easier and more stable network operation.